I rebuilt a pair of SU HIF6 carbs so had no reference settings for them so had to start from scratch. If your engine is running it would be worth noting the current settings before you start changing the mixture.
I appologise in advance if my carbs are a little dirty, but the old carbs were used for the photos. The linkages are not standard so may differ slightly from yours. Also if your removing the carbs from an engine to work on, run them dry of fuel as the float bowls hold plenty of flammable fuel.
Step 1 - Basic Setting
Remove any air cleaners and related pipework so you have good access to the back of the carbs and can see the piston through the front of each carb. Also disconnect the throttle bar that links the carbs so that they can be adjusted individually.
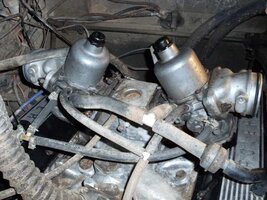
Now remove the Piston and suction chamber located on top of each carb, this is held on by three screws. Withdraw the suction chamber carefully keeping it straight until the needle is free from the carb body
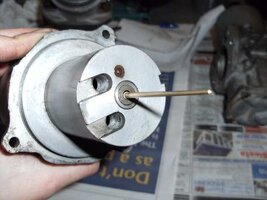
Piston and Mixture needle
Idle - To set the Idle you need to unwind the the idle setting screws on each carb in turn until the screw just touches the throttle stop whilst the throttle disc stays completely closed. If you screw the idle adjuster down a little further you will see the throttle disc begin to open which would increase your idle.
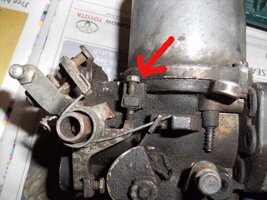
Idle screw
Mixture - To set the mixture you need to move the jet to the top of the jet guide. You can see the jet moving up and down if you peer down the top of the carb. Screwing in the mixture screw lowers the jet (increasing mixture) whilst screwing it out raises the jet (weakens the mixture).
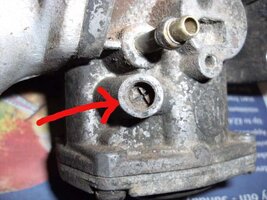
Mixture screw just below the fuel intake
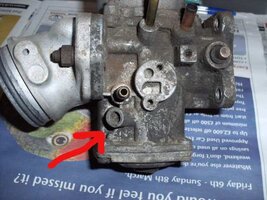
Once you have the Jet level with the top of the jet guide turn the mixture screw in two turns and this is the basic mixture setting to allow your engine to run.
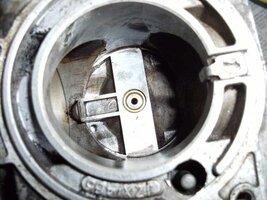
Jet and jet guide
Once you have set the jet height you can put the pistons/needles back into the carbs, be careful not to bend the needle and lower the piston in gently. There is a guide to prevent the piston from turning and this will line up with a groove in the piston.
Top Tip - Once you have got the jet level with the guide its a good idea to turn the mixture screw all the way in counting the number of turns until the screw stoops turning. You can then screw it out by the number of turns to reset to factory. This means you do not have to strip your carbs and air filters off for future settings. For reference It takes 7 full turns to get my carbs to basic setting.
Step 2 - Tunning
Piston Oil Level - Before we start the engine we need to check the piston is free to move and operates smoothly. To do this, stick your finger in and gently move the piston to the top of its travel. There should be some resistance and when released the piston should fall smoothly through its full range of travel.
If the piston moves too freely or bangs down when released you will need to add oil to the top of the piston. I use 3-in-1 oil which is commonly recommended as the right weight oil. Don't worry if you overfill, excess oil will be expelled through the vent in the cap.
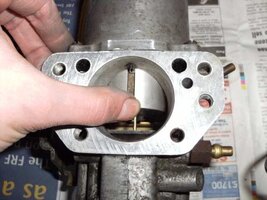
Moving the piston by hand
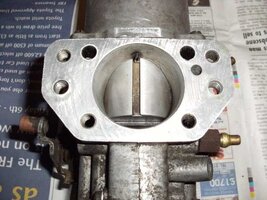
Starting - Ok here comes the fun part. Start the engine up, it should fire up without a problem as it will be set quite rich. If needed, increase the idles speed on each carb until the engine idles smoothly. Remember that the carbs are not linked so any throttle inputs will only operate one carb.
Leave the engine warm up to normal operating temperature before setting up the carbs. Once the thermostat opens the engine should be up to temp, if you have an electric fan allow it to cycle on and off to confirm you are at temp. Also ensure the choke is fully in, disconnect it to be sure.
Balancing - You can use a pair of vacuum gauges to balance the carbs, but if you do not have these available you can just use a length of hose to listen to the sound of each carb. Put one end next to the carb intake and the other end in you're ear, adjust the idle until both carbs make the same amount of noise. Its basic but it works
Once the carbs are balanced you can re-connect the throttle bar linking the carbs together again. this may need some adjustment to ensure the carbs remain balanced. Idealy you want both carbs to crack open and reach full throttle at the same time.
Setting the mixture - Ideally you want an exhaust gas analyser, although not many home mechanics have one of these, I certainly don't. Thankfully most SU carbs have a lift pin at the back of the carb that allow you to set the mixture without any special tools. These are hard to find, even when you know where they are, often hidden by the choke mechanism.
The idea of the lift pin is that it lifts the piston a pre-defined distance, if the engine speed increases then your mixture is too rich, if the engine speed decreases then the mixture is too weak.
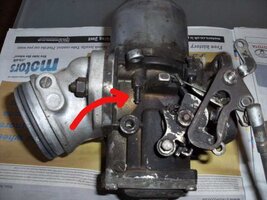
Lift pin
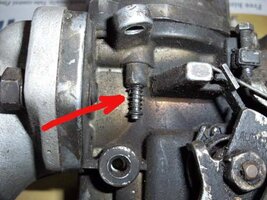
Close up
With the engine running turn each mixture adjustment screw by the same amount until the fastest idle with even running is obtained. You may need to adjust the idle screws to lower/raise the idle speed back to its normal setting. You should only have to adjust the idle on one carb now as they are connected, you can adjust the second carbs idle screw to rest on the throttle stop once you have finished. It may be worth adjusting the the mixture again until you are happy with the engines idle and running.
Once you are happy with the idle speed and basic mixture setting reach behind the carbs and operate the lift pins, if the engine speed increases then your mixture is too rich, if the engine speed decreases then the mixture is too weak.
To enrich the mixture, screw in the mixture screw, to weaken screw it out. Adjust each screw until operating the lift pins makes no or little change to the engine speed. Its worth noting that when you put the air filters back on this will enrichen the mixture so you may ant to check the mixture again once you have fitted the air box.
Hopefully your engine will be running well, and ready for a test drive, keep an eye on the temp gauge as your engine will run hot if to weak and you will get black smoke if it running to rich.
I appologise in advance if my carbs are a little dirty, but the old carbs were used for the photos. The linkages are not standard so may differ slightly from yours. Also if your removing the carbs from an engine to work on, run them dry of fuel as the float bowls hold plenty of flammable fuel.
Step 1 - Basic Setting
Remove any air cleaners and related pipework so you have good access to the back of the carbs and can see the piston through the front of each carb. Also disconnect the throttle bar that links the carbs so that they can be adjusted individually.

Now remove the Piston and suction chamber located on top of each carb, this is held on by three screws. Withdraw the suction chamber carefully keeping it straight until the needle is free from the carb body

Piston and Mixture needle
Idle - To set the Idle you need to unwind the the idle setting screws on each carb in turn until the screw just touches the throttle stop whilst the throttle disc stays completely closed. If you screw the idle adjuster down a little further you will see the throttle disc begin to open which would increase your idle.

Idle screw
Mixture - To set the mixture you need to move the jet to the top of the jet guide. You can see the jet moving up and down if you peer down the top of the carb. Screwing in the mixture screw lowers the jet (increasing mixture) whilst screwing it out raises the jet (weakens the mixture).

Mixture screw just below the fuel intake

Once you have the Jet level with the top of the jet guide turn the mixture screw in two turns and this is the basic mixture setting to allow your engine to run.

Jet and jet guide
Once you have set the jet height you can put the pistons/needles back into the carbs, be careful not to bend the needle and lower the piston in gently. There is a guide to prevent the piston from turning and this will line up with a groove in the piston.
Top Tip - Once you have got the jet level with the guide its a good idea to turn the mixture screw all the way in counting the number of turns until the screw stoops turning. You can then screw it out by the number of turns to reset to factory. This means you do not have to strip your carbs and air filters off for future settings. For reference It takes 7 full turns to get my carbs to basic setting.
Step 2 - Tunning
Piston Oil Level - Before we start the engine we need to check the piston is free to move and operates smoothly. To do this, stick your finger in and gently move the piston to the top of its travel. There should be some resistance and when released the piston should fall smoothly through its full range of travel.
If the piston moves too freely or bangs down when released you will need to add oil to the top of the piston. I use 3-in-1 oil which is commonly recommended as the right weight oil. Don't worry if you overfill, excess oil will be expelled through the vent in the cap.

Moving the piston by hand

Starting - Ok here comes the fun part. Start the engine up, it should fire up without a problem as it will be set quite rich. If needed, increase the idles speed on each carb until the engine idles smoothly. Remember that the carbs are not linked so any throttle inputs will only operate one carb.
Leave the engine warm up to normal operating temperature before setting up the carbs. Once the thermostat opens the engine should be up to temp, if you have an electric fan allow it to cycle on and off to confirm you are at temp. Also ensure the choke is fully in, disconnect it to be sure.
Balancing - You can use a pair of vacuum gauges to balance the carbs, but if you do not have these available you can just use a length of hose to listen to the sound of each carb. Put one end next to the carb intake and the other end in you're ear, adjust the idle until both carbs make the same amount of noise. Its basic but it works
Once the carbs are balanced you can re-connect the throttle bar linking the carbs together again. this may need some adjustment to ensure the carbs remain balanced. Idealy you want both carbs to crack open and reach full throttle at the same time.
Setting the mixture - Ideally you want an exhaust gas analyser, although not many home mechanics have one of these, I certainly don't. Thankfully most SU carbs have a lift pin at the back of the carb that allow you to set the mixture without any special tools. These are hard to find, even when you know where they are, often hidden by the choke mechanism.
The idea of the lift pin is that it lifts the piston a pre-defined distance, if the engine speed increases then your mixture is too rich, if the engine speed decreases then the mixture is too weak.

Lift pin

Close up
With the engine running turn each mixture adjustment screw by the same amount until the fastest idle with even running is obtained. You may need to adjust the idle screws to lower/raise the idle speed back to its normal setting. You should only have to adjust the idle on one carb now as they are connected, you can adjust the second carbs idle screw to rest on the throttle stop once you have finished. It may be worth adjusting the the mixture again until you are happy with the engines idle and running.
Once you are happy with the idle speed and basic mixture setting reach behind the carbs and operate the lift pins, if the engine speed increases then your mixture is too rich, if the engine speed decreases then the mixture is too weak.
To enrich the mixture, screw in the mixture screw, to weaken screw it out. Adjust each screw until operating the lift pins makes no or little change to the engine speed. Its worth noting that when you put the air filters back on this will enrichen the mixture so you may ant to check the mixture again once you have fitted the air box.
Hopefully your engine will be running well, and ready for a test drive, keep an eye on the temp gauge as your engine will run hot if to weak and you will get black smoke if it running to rich.
