You knew this was coming! It has to be done you know – and why pay somebody to do it, you own a series Landy, you are more than capable!
The procedures outlined below are common to most 2.25 engined series vehicles; there might be some differences, which I will try to point out… (I personally have more experience with diesel engines though, so remember I’m not infallible!) Land rover recommend changing the engine oil every 6,000 miles, but I do it a lot more often than that, sometimes as often as every 1,500 miles, and never more than 3,000 miles. (Fussy, see!)
First of all, don’t be tempted to use an engine flushing additive before changing your engine oil! This stuff is fine if you have a modern engine, and have used it from new on a clean engine, but with an older engine chances are that there is a goodly deposit of sediment in the sump which the additive could lift and distribute around the working parts of the engine, and the type of oil filter fitted to your Landy might not be fine enough to filter these particles out.
Allow the engine to cool, and give time for the oil to drain down out of the galleries in the engine and back down to the sump. Obtain a suitable container to catch the oil (these trays are available from auto parts accessory shops). The sump drain plug is situated on the driver’s side of the engine:
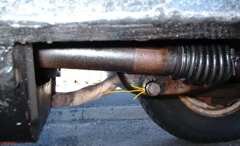
Be prepared for the sudden flow of oil as you remove it, as initially it will come out with some force. Leave the sump to drain whilst you concentrate on the oil filter, which is in a canister mounted on the driver’s side of the engine:
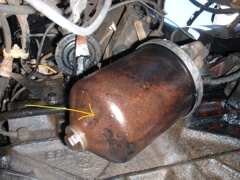
Undo the 5/8” bolt, and the canister will come loose – there are roughly 1.5 pints of oil in there, which will issue out of the higher part of the housing as you loosen it. It’s situated in such a position that the oil will drop onto the front propshaft before reaching the oil catching container, so that might need repositioning to catch the oil. (Odds are, you will get a goodly amount running down your arm too!)
There is a vinyl gasket/seal in the housing – you need to remove this – it might be a bit stubborn though, in which case a sharp point pressed into the gasket/seal will aid removal if you turn the seal in a circular direction. Clean the inside of the canister (wash with petrol, or wipe with a clean, lint free, cloth) and fit the new filter:
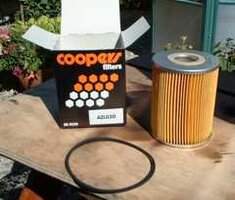
Fit the new seal, remembering to give it a smear of new oil first. Now refit the canister and filter. It might take a bit of jiggling to get the bolt back in the housing, so be prepared. Patience will win out!
Replace the sump plug, using a new copper washer, or a light smear of Hylomar/Hermetite or similar, and you are ready to replace the old oil with nice clean oil (multi-grade to 20–50).
You will have bought two gallons of oil in preparation for this job – The total amount for the engine oil change is (with new filter) 12.5 pints (6.85 litres) for both petrol and diesel engines. So, you have some oil left over! Then, you can use this in the air cleaner element!
Undo the elephant’s trunk (it looks like one, doesn’t it?) from the air cleaner canister (usually situated on the driver’s side of the engine bay) and then undo the wingnut holding the clasp at the top of the air cleaner. (watch out though, sometimes the wee nut can slip out and drop on the floor). Lift out the canister:
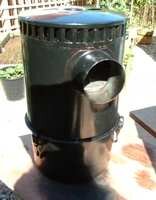
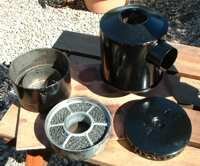
Keeping it the right way up, undo the three clasps holding the two sections of the canister together, and carefully remove the top section. There is a wire mesh section in the bottom part of the assembly; remove this and then drain the old oil out of the container:
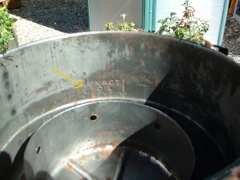
Clean this, and the wire mesh element with petrol, but be aware, the centre section of the oil bath is very sharp and will cut you if you aren’t careful. Loosen any sediment with a blunt instrument (a stick or suchlike) and rinse with petrol. (At this point, check the oil bath carefully for any holes; sometimes small pieces of grit can be caught in the air cleaner housing and over time wear a hole in the air cleaner base. Clean the outside of the canister and also the air cleaner housing/battery box.) The top section can also be cleaned with petrol, give it a good swish around to remove all the dirt and grit; the very top of the canister will come off too for cleaning. Refill with clean oil: to the level marked on the side of the oil bath canister, which should be 1.5 pints (0.85 litres): (or level with the holes in the inside ...both the centre and the outer should be level, thats what the holes in the centre of the filter housing you can see in the photo below are for, to allow the oil to find a level between the two.)

Then reassemble and refit the air cleaner.
Now, run the engine (don’t rev it at first, there will be no oil pressure until the filter housing is full of oil…wait for the oil pressure warning light to go out) and check for leaks. Stop the engine, and allow the oil to settle, then recheck the oil level on the dipstick – top up if necessary.
There you go, job done! You will be changing the oil in the gearbox next!
The procedures outlined below are common to most 2.25 engined series vehicles; there might be some differences, which I will try to point out… (I personally have more experience with diesel engines though, so remember I’m not infallible!) Land rover recommend changing the engine oil every 6,000 miles, but I do it a lot more often than that, sometimes as often as every 1,500 miles, and never more than 3,000 miles. (Fussy, see!)
First of all, don’t be tempted to use an engine flushing additive before changing your engine oil! This stuff is fine if you have a modern engine, and have used it from new on a clean engine, but with an older engine chances are that there is a goodly deposit of sediment in the sump which the additive could lift and distribute around the working parts of the engine, and the type of oil filter fitted to your Landy might not be fine enough to filter these particles out.
Allow the engine to cool, and give time for the oil to drain down out of the galleries in the engine and back down to the sump. Obtain a suitable container to catch the oil (these trays are available from auto parts accessory shops). The sump drain plug is situated on the driver’s side of the engine:

Be prepared for the sudden flow of oil as you remove it, as initially it will come out with some force. Leave the sump to drain whilst you concentrate on the oil filter, which is in a canister mounted on the driver’s side of the engine:

Undo the 5/8” bolt, and the canister will come loose – there are roughly 1.5 pints of oil in there, which will issue out of the higher part of the housing as you loosen it. It’s situated in such a position that the oil will drop onto the front propshaft before reaching the oil catching container, so that might need repositioning to catch the oil. (Odds are, you will get a goodly amount running down your arm too!)
There is a vinyl gasket/seal in the housing – you need to remove this – it might be a bit stubborn though, in which case a sharp point pressed into the gasket/seal will aid removal if you turn the seal in a circular direction. Clean the inside of the canister (wash with petrol, or wipe with a clean, lint free, cloth) and fit the new filter:

Fit the new seal, remembering to give it a smear of new oil first. Now refit the canister and filter. It might take a bit of jiggling to get the bolt back in the housing, so be prepared. Patience will win out!
Replace the sump plug, using a new copper washer, or a light smear of Hylomar/Hermetite or similar, and you are ready to replace the old oil with nice clean oil (multi-grade to 20–50).
You will have bought two gallons of oil in preparation for this job – The total amount for the engine oil change is (with new filter) 12.5 pints (6.85 litres) for both petrol and diesel engines. So, you have some oil left over! Then, you can use this in the air cleaner element!
Undo the elephant’s trunk (it looks like one, doesn’t it?) from the air cleaner canister (usually situated on the driver’s side of the engine bay) and then undo the wingnut holding the clasp at the top of the air cleaner. (watch out though, sometimes the wee nut can slip out and drop on the floor). Lift out the canister:

Keeping it the right way up, undo the three clasps holding the two sections of the canister together, and carefully remove the top section. There is a wire mesh section in the bottom part of the assembly; remove this and then drain the old oil out of the container:

Clean this, and the wire mesh element with petrol, but be aware, the centre section of the oil bath is very sharp and will cut you if you aren’t careful. Loosen any sediment with a blunt instrument (a stick or suchlike) and rinse with petrol. (At this point, check the oil bath carefully for any holes; sometimes small pieces of grit can be caught in the air cleaner housing and over time wear a hole in the air cleaner base. Clean the outside of the canister and also the air cleaner housing/battery box.) The top section can also be cleaned with petrol, give it a good swish around to remove all the dirt and grit; the very top of the canister will come off too for cleaning. Refill with clean oil: to the level marked on the side of the oil bath canister, which should be 1.5 pints (0.85 litres): (or level with the holes in the inside ...both the centre and the outer should be level, thats what the holes in the centre of the filter housing you can see in the photo below are for, to allow the oil to find a level between the two.)


Then reassemble and refit the air cleaner.
Now, run the engine (don’t rev it at first, there will be no oil pressure until the filter housing is full of oil…wait for the oil pressure warning light to go out) and check for leaks. Stop the engine, and allow the oil to settle, then recheck the oil level on the dipstick – top up if necessary.
There you go, job done! You will be changing the oil in the gearbox next!
