Built in the UK by a company called Searle and largely based on Land Rover vehicles, the range of Carawagon conversions includes not only civilian campers, but also specific military variants forming command posts and field accommodation for officers. Variants for mobile medical treatment in the third world were also produced.
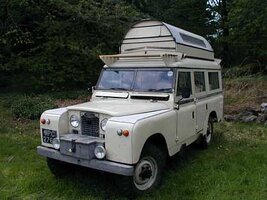
This is my Carawagon. Built in 1966 and converted from new to Searle's Continental Ultimate specification, with a double berth converted from the seats and a single sling bunk. I know little of the history before I purchased it in 1999. It had spent the previous four years in "dry" storage standing over a pit which at some time had flooded; the consequences of this were not obvious when I agreed to buy it! The previous owner had bought it to act as tender for his son's trials bike and had decided it was too slow for the long runs they went on between events. Prior to this, I guess in the early nineties, it had been in the Aberdeen area where the then owner had undertaken some interior restoration. Judging by the cement I discovered under the carpet, I guess it had lost most of its original interior and spent part of its previous life as a builders wagon!
My first task was to get the vehicle mobile, which involved replacing all brake wheel cylinders, master cylinder and clutch master cylinder. That done, the vehicle was trailered to Donald Hynde (now retired) of WW Scott Motor Engineers, where the ravages of the flooded pit became more evident. The rear cross member was replaced and a bit of welding done to outriggers. The battery was replaced, the radiator re-cored and the header tank soldered up, so that within a month of purchase an MOT was obtained and the vehicle took to the road. After a few minor glitches, including replacing a faulty brake master cylinder and more soldering to the header tank, I took the Carawagon on the first of many short trips to the West Highlands.
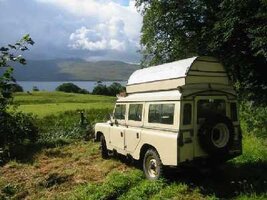
Over the following winter, the Carawagon resided in the only lock up I could find in Edinburgh big enough to fit. On the odd weekend I spent time cleaning up and de-rusting the chassis, tidying up the interior. During its first outing in the new millennium at Easter 2000, the driver's door refused to stay shut. Investigation revealed that the station wagon sideframe had corroded to such an extent that it had parted company with the bulkhead outrigger and door post. At the other end the D post was held to the bottom rail by about 3mm of rust! This gave me 10 weeks to repair this for the MOT. Frantic phone calls looking for professional help bore no fruit; this was "too big a job".
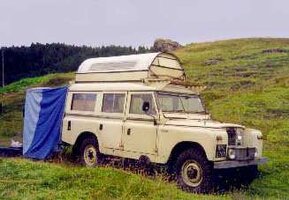
Faced with "no choice" I did what research I could and took it all to bits. Of course with most surgery complications set in. First problem was that the A post was in equally bad shape. The footwell had previously been repaired by jamming a repair section in over the rusted original. Second was that the bulkhead outrigger's top face was largely absent! The first idea was to cut and shut a new footwell repair section and replace the outrigger and A post. I bought all the relevant repair sections, but it was obvious this would not be a simple bolt back together job, as none of the sections exactly fitted. As the bulkhead outrigger was the most solid point of reference, I resolved to patch this and rebuild all the other sections around it. The footwell went in as a complete section. This required the drilling out of more than 30 spot welds in the sandwich construction, and the new section was inserted between the remaining panels and riveted and welded in place. The replacement sideframe is in fact the current version fitted to the 110 station wagon; it fitted exactly with all the holes in the right places, so what I thought would be the most difficult bit of the job turned out to be the easiest. The A post was an altogether different matter. No matter how I put the leg and bracket together they would not fit. The principle of “measure twice cut once” became “measure check measure check go away scratch head” and in the end I went for it and managed to get it all to fit. So off to the MOT via Donald and it passed, with another bit of welding to the rear spring outrigger.[BREAK]
I then thought about reducing the four colours of Limestone to one, starting with the passenger side where there was ally showing through the paint on the back wing. I was given the name of a car paint supplier and duly went to get coach paint. The supplier matched the most original colour and I managed to get the passenger side painted before running out as I had only intended to cover the thinnest areas. When I went back for more the trouble started. It seems that the original colour I had been given was mixed wrong so no matter what they did they could not match it; well at least I was down to two colours of Limestone!
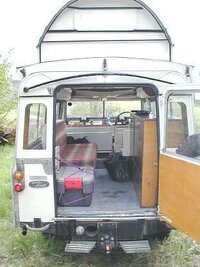
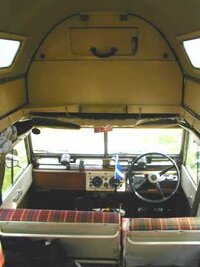
Winter 2000 / 2001 saw a serious start on the interior. The previous restoration had included a rough upholstery job in a vile blue nylon curtain material. This had become ratty and dirty. I found some reasonable flame retardant fabric and set about learning to use a sewing machine! The results are really quite pleasing! I also tackled the door linings, where the hardboard had gone soft and was no longer held to the doors. Here I used plywood for the lower sections and re-covered the upper sections in leatherette similar to that used for the slings around the upper section of the vehicle.
In 2001 I took it to the All Rover Shows at East Fortune and Beamish. Much to my surprise it was awarded second best in show for series 2s at the Beamish show.
Useful resources:
Badges

This badge is a reproduction of those found on the wings and rear panels of Carawagons. I had a batch of these manufactured and have some for sale. They are true reproductions in etched aluminium and cost £27 each.
Land Rover Parts
Paddock Motors provided me with excellent service for good value genuine and pattern parts for my vehicle.
Paddock Motors +44 (0)1629 584499
Insurance
Footman James are a specialist broker who do really good deals on historic vehicles. They provide cover for my Carawagon on an agreed value basis, fully comprehensive cover. It is a vintage commercial vehicle policy.
Footman James & Co.Ltd 0121 561 4196
Upholstery
Trying to find the correct materials for the interior re-trim proved to be a major problem. Eventually I found Segal Ltd. who can match most materials. I used their Cream Vynide for the interior where I need to replace the original leatherette on the door linings and it is a close match for the slings along the roof. They can either match a sample of your material or send you a swatch for you to match.
Segal (Motor Trimmings) Ltd 0161 834 7994

This is my Carawagon. Built in 1966 and converted from new to Searle's Continental Ultimate specification, with a double berth converted from the seats and a single sling bunk. I know little of the history before I purchased it in 1999. It had spent the previous four years in "dry" storage standing over a pit which at some time had flooded; the consequences of this were not obvious when I agreed to buy it! The previous owner had bought it to act as tender for his son's trials bike and had decided it was too slow for the long runs they went on between events. Prior to this, I guess in the early nineties, it had been in the Aberdeen area where the then owner had undertaken some interior restoration. Judging by the cement I discovered under the carpet, I guess it had lost most of its original interior and spent part of its previous life as a builders wagon!
My first task was to get the vehicle mobile, which involved replacing all brake wheel cylinders, master cylinder and clutch master cylinder. That done, the vehicle was trailered to Donald Hynde (now retired) of WW Scott Motor Engineers, where the ravages of the flooded pit became more evident. The rear cross member was replaced and a bit of welding done to outriggers. The battery was replaced, the radiator re-cored and the header tank soldered up, so that within a month of purchase an MOT was obtained and the vehicle took to the road. After a few minor glitches, including replacing a faulty brake master cylinder and more soldering to the header tank, I took the Carawagon on the first of many short trips to the West Highlands.

Over the following winter, the Carawagon resided in the only lock up I could find in Edinburgh big enough to fit. On the odd weekend I spent time cleaning up and de-rusting the chassis, tidying up the interior. During its first outing in the new millennium at Easter 2000, the driver's door refused to stay shut. Investigation revealed that the station wagon sideframe had corroded to such an extent that it had parted company with the bulkhead outrigger and door post. At the other end the D post was held to the bottom rail by about 3mm of rust! This gave me 10 weeks to repair this for the MOT. Frantic phone calls looking for professional help bore no fruit; this was "too big a job".

Faced with "no choice" I did what research I could and took it all to bits. Of course with most surgery complications set in. First problem was that the A post was in equally bad shape. The footwell had previously been repaired by jamming a repair section in over the rusted original. Second was that the bulkhead outrigger's top face was largely absent! The first idea was to cut and shut a new footwell repair section and replace the outrigger and A post. I bought all the relevant repair sections, but it was obvious this would not be a simple bolt back together job, as none of the sections exactly fitted. As the bulkhead outrigger was the most solid point of reference, I resolved to patch this and rebuild all the other sections around it. The footwell went in as a complete section. This required the drilling out of more than 30 spot welds in the sandwich construction, and the new section was inserted between the remaining panels and riveted and welded in place. The replacement sideframe is in fact the current version fitted to the 110 station wagon; it fitted exactly with all the holes in the right places, so what I thought would be the most difficult bit of the job turned out to be the easiest. The A post was an altogether different matter. No matter how I put the leg and bracket together they would not fit. The principle of “measure twice cut once” became “measure check measure check go away scratch head” and in the end I went for it and managed to get it all to fit. So off to the MOT via Donald and it passed, with another bit of welding to the rear spring outrigger.[BREAK]
I then thought about reducing the four colours of Limestone to one, starting with the passenger side where there was ally showing through the paint on the back wing. I was given the name of a car paint supplier and duly went to get coach paint. The supplier matched the most original colour and I managed to get the passenger side painted before running out as I had only intended to cover the thinnest areas. When I went back for more the trouble started. It seems that the original colour I had been given was mixed wrong so no matter what they did they could not match it; well at least I was down to two colours of Limestone!

Winter 2000 / 2001 saw a serious start on the interior. The previous restoration had included a rough upholstery job in a vile blue nylon curtain material. This had become ratty and dirty. I found some reasonable flame retardant fabric and set about learning to use a sewing machine! The results are really quite pleasing! I also tackled the door linings, where the hardboard had gone soft and was no longer held to the doors. Here I used plywood for the lower sections and re-covered the upper sections in leatherette similar to that used for the slings around the upper section of the vehicle.

In 2001 I took it to the All Rover Shows at East Fortune and Beamish. Much to my surprise it was awarded second best in show for series 2s at the Beamish show.
Useful resources:
Badges

This badge is a reproduction of those found on the wings and rear panels of Carawagons. I had a batch of these manufactured and have some for sale. They are true reproductions in etched aluminium and cost £27 each.
Land Rover Parts
Paddock Motors provided me with excellent service for good value genuine and pattern parts for my vehicle.
Paddock Motors +44 (0)1629 584499
Insurance
Footman James are a specialist broker who do really good deals on historic vehicles. They provide cover for my Carawagon on an agreed value basis, fully comprehensive cover. It is a vintage commercial vehicle policy.
Footman James & Co.Ltd 0121 561 4196
Upholstery
Trying to find the correct materials for the interior re-trim proved to be a major problem. Eventually I found Segal Ltd. who can match most materials. I used their Cream Vynide for the interior where I need to replace the original leatherette on the door linings and it is a close match for the slings along the roof. They can either match a sample of your material or send you a swatch for you to match.
Segal (Motor Trimmings) Ltd 0161 834 7994
