I recently cleaned up and painted the locks for my series 3. After, the rubber coated handles looked decidedly tired – dull, scratched and chipped. I was told of a product called Plasti Dip and decided to try it out.
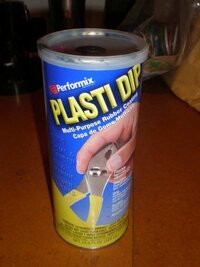
PlastiDip (429ml)
I bought directly from PlastiDip and everything went smoothly. The site (and the order form) both recommended the use of their primer as well. However, I regarded it as an experiment, it was on existing rubber and not bare metal – plus the primer was quite expensive. I paid £8 for a regular sized can of black Plasti Dip (429ml). The primer would have been another £7 for 500ml. So with VAT and delivery it was £13.80. Other colours are available.
The can has a handy pop-off lid with a ring pull cover under neath. It is also comparatively tall and thin – much better for dipping items in. It is covered in warnings, both the liquid and vapour are extremely flammable, and the vapour can also cause flash fires – so, no smoking J It is known to be cancer causing, cause birth defects and reproductive harm – basically, be VERY careful with it – good ventilation (although it doesn't smell of much) is essential.
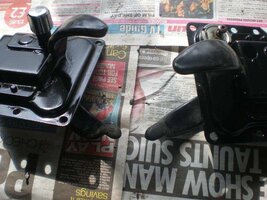
Refurbed lock units with tired rubber coated handles
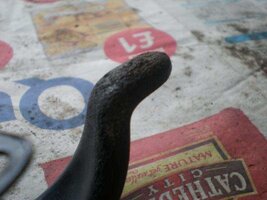
Close up of a bad area of coating
In preparation I lightly sanded the rubber coated handles to break any glossy surface, added ties to the units for hanging up and stirred the PlastiDip.
There is a definite technique to dipping. The instructions say to insert object at the rate of 1" every 5 seconds and withdraw it at the same rate. I don't think the insertion speed to too critical, but withdrawal is. The product is fairly gloopy, so pulling the handle out brings out a lot of product, which then wants to run. Withdrawing it slowly stops this to a great extent, it seems as though it tries to cling on to the product left in the tin, pulling the excess off of your dipped object.

Withdrawing first handle…
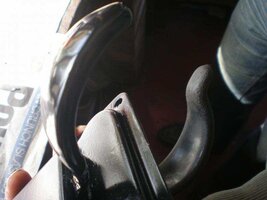
… and comparing it with the undipped side
The very best way to remove the object from the dip is as vertical as possible and slowly. This aids removal of excess (a little fiddly with a curved object like the handle but perfectly possible). Even so, the very last bit to come out wants to run and at best will cause a bead of excess. The solution is to immediately turn the item over, causing the excess flow back in the main portion of applied dip under the new skin which quickly forms. Keep examining the object and turning it so any excess is at the top and is evening out. In a couple of minutes it will have settled and the item can be hung up.
I applied a 2nd coat after 30 minutes in the same way and by then was much more practiced…
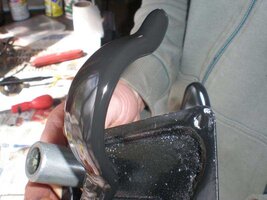
2nd coat added
The product soon dried (takes 4 hours to officially dry, but I am leaving it overnight) and took on its final finish – what PlastiDip call a soft matt and I would agree! The product has instantly made the handles look factory fresh and was well worth the expense.
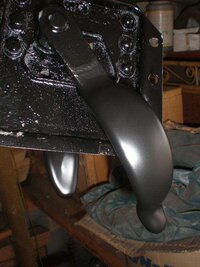
Finished handles
In summary:
The product is pretty expensive really but gives an absolutely excellent finish – factory quality and requires only a little practice and care to get a fantastic result for that special finishing touch. It is a potentially dangerous product, but used with care enables you to produce something that would be very hard to any other way.
I thoroughly recommend it!

PlastiDip (429ml)
I bought directly from PlastiDip and everything went smoothly. The site (and the order form) both recommended the use of their primer as well. However, I regarded it as an experiment, it was on existing rubber and not bare metal – plus the primer was quite expensive. I paid £8 for a regular sized can of black Plasti Dip (429ml). The primer would have been another £7 for 500ml. So with VAT and delivery it was £13.80. Other colours are available.
The can has a handy pop-off lid with a ring pull cover under neath. It is also comparatively tall and thin – much better for dipping items in. It is covered in warnings, both the liquid and vapour are extremely flammable, and the vapour can also cause flash fires – so, no smoking J It is known to be cancer causing, cause birth defects and reproductive harm – basically, be VERY careful with it – good ventilation (although it doesn't smell of much) is essential.

Refurbed lock units with tired rubber coated handles

Close up of a bad area of coating
In preparation I lightly sanded the rubber coated handles to break any glossy surface, added ties to the units for hanging up and stirred the PlastiDip.
There is a definite technique to dipping. The instructions say to insert object at the rate of 1" every 5 seconds and withdraw it at the same rate. I don't think the insertion speed to too critical, but withdrawal is. The product is fairly gloopy, so pulling the handle out brings out a lot of product, which then wants to run. Withdrawing it slowly stops this to a great extent, it seems as though it tries to cling on to the product left in the tin, pulling the excess off of your dipped object.

Withdrawing first handle…

… and comparing it with the undipped side
The very best way to remove the object from the dip is as vertical as possible and slowly. This aids removal of excess (a little fiddly with a curved object like the handle but perfectly possible). Even so, the very last bit to come out wants to run and at best will cause a bead of excess. The solution is to immediately turn the item over, causing the excess flow back in the main portion of applied dip under the new skin which quickly forms. Keep examining the object and turning it so any excess is at the top and is evening out. In a couple of minutes it will have settled and the item can be hung up.
I applied a 2nd coat after 30 minutes in the same way and by then was much more practiced…

2nd coat added
The product soon dried (takes 4 hours to officially dry, but I am leaving it overnight) and took on its final finish – what PlastiDip call a soft matt and I would agree! The product has instantly made the handles look factory fresh and was well worth the expense.

Finished handles
In summary:
The product is pretty expensive really but gives an absolutely excellent finish – factory quality and requires only a little practice and care to get a fantastic result for that special finishing touch. It is a potentially dangerous product, but used with care enables you to produce something that would be very hard to any other way.
I thoroughly recommend it!
