• Welcome to the Land Rover UK Forums

    You are currently viewing the site as a guest and some content may not be available to you.

    Registration is quick and easy and will give you full access to the site and allow you to ask questions or make comments and join in on the conversation. If you would like to register then please Register Now

1971 Series IIa 88" Overhaul

I tightened up all the clutch parts, filled the master cylinder, and bled the system as per the manual. That didn't work at all so I reverted to the way my Dad taught me to do it and had it bubble-free in five minutes. Crack the bleeder and push down on the pedal, snug up the bleeder and let the pedal up slow. Repeat until fluid runs clear. No problem.
I immediately ran into another issue though: not enough rod adjustment available at the slave. I ended up having to make up a longer slave pushrod to get the pressure plate to cycle properly. Even though I went to the trouble of setting the release bearing actuator fork splines as per the factory specs it seems the outside arm on the gearbox isn't at an optimal angle. I think I'm out a spline or two and the gearbox arm is a little too "level". I think it should be pointing upward a bit.
20240426_221124.jpg

It all seems to be working though and has that positive soft-then-stiff-then-soft again feel but the release bearing is hard against the pressure plate, which it shouldn't be. Not by much but it is contacting it. I'm not sure what is wrong but it sort of feels like the master cylinder doesn't have enough stroke to actuate the clutch properly. The pedal looks odd too being somewhat lower than the brake and no more adjustment available. Hmmm....
20240426_232244.jpg

20240426_232344.jpg

The clutch master cylinder that I chose was the same as what came out of it but I'm not entirely sure it's the correct one for this clutch system. I installed a 550732 which is listed as for a Defender as near as I can tell so that's odd. Perhaps it doesn't have enough travel or has too small of a bore for a Series IIa. This is the one that it came with:
20240426_232950.jpg

So I guess I'll keep on playing with the adjustments and see if I can get things working better. I want to make sure I've exhausted all my options before I tear out the gearbox and readjust the splined coupling on the release bearing fork, or go another direction with the clutch master. I think I'll walk away from it for the night and come back to it tomorrow with a clearer head. I've spent two days on this task that isn't even on my whiteboard and it looks like it'll need two more if I pull the gearbox. Unforeseen yet expected difficulties - the hallmark of working on fifty year old vehicles. šŸ˜
20240426_233635.jpg
 
I tightened up all the clutch parts, filled the master cylinder, and bled the system as per the manual. That didn't work at all so I reverted to the way my Dad taught me to do it and had it bubble-free in five minutes. Crack the bleeder and push down on the pedal, snug up the bleeder and let the pedal up slow. Repeat until fluid runs clear. No problem.
I immediately ran into another issue though: not enough rod adjustment available at the slave. I ended up having to make up a longer slave pushrod to get the pressure plate to cycle properly. Even though I went to the trouble of setting the release bearing actuator fork splines as per the factory specs it seems the outside arm on the gearbox isn't at an optimal angle. I think I'm out a spline or two and the gearbox arm is a little too "level". I think it should be pointing upward a bit.
View attachment 530357
It all seems to be working though and has that positive soft-then-stiff-then-soft again feel but the release bearing is hard against the pressure plate, which it shouldn't be. Not by much but it is contacting it. I'm not sure what is wrong but it sort of feels like the master cylinder doesn't have enough stroke to actuate the clutch properly. The pedal looks odd too being somewhat lower than the brake and no more adjustment available. Hmmm....
View attachment 530358
View attachment 530359
The clutch master cylinder that I chose was the same as what came out of it but I'm not entirely sure it's the correct one for this clutch system. I installed a 550732 which is listed as for a Defender as near as I can tell so that's odd. Perhaps it doesn't have enough travel or has too small of a bore for a Series IIa. This is the one that it came with:
View attachment 530360
So I guess I'll keep on playing with the adjustments and see if I can get things working better. I want to make sure I've exhausted all my options before I tear out the gearbox and readjust the splined coupling on the release bearing fork, or go another direction with the clutch master. I think I'll walk away from it for the night and come back to it tomorrow with a clearer head. I've spent two days on this task that isn't even on my whiteboard and it looks like it'll need two more if I pull the gearbox. Unforeseen yet expected difficulties - the hallmark of working on fifty year old vehicles. šŸ˜
View attachment 530361

I love that part ā€¦šŸ¤£

IMG_3826.jpeg
 
Thats two of us then...
My recollection is that there are variations in the slave cylinders which require different lengths of pushrod.
Its been done a few times before so a search on the forum should pull up some info..
 
The push rod on the 2/2a gearbox is generally the same size, but is somewhat adjustable by the locking nuts on the threaded part. On the type here, extra push is given by turning the operating rods on the splines an extra notch. They do wear, hence the threaded bit....

There are different lengths on the late 2a and 3 clutch right enough. Though I don't really know why that should be, unless it's a petrol-diesel thing.
Thanks Big Sandy. I'm pretty sure I'm going to need to re-adjust the splined fork which sucks as I'll have to pull out the gearbox to do it. I haven't test-run the engine yet so I think I'll do that first in case the box needs to come out for any other reason as well.
 
It's weird that you both need a longer rod to actuate the clutch fully, but now have a rod that is clearly already too long as it won't allow the clutch release bearing to travel far enough to disengage fully.
I have plenty of room either end of my slave cylinder travel and my arm is pretty much straight out like yours.
Maybe a turn less or so on the adjuster threads on the op-rod?
I'm assuming you set pedal height and master freeplay as per the good book?
Yes it is weird. Right now I've got as much pedal movement as I can get with just a little freeplay at the top. With the slave pushrod adjusted so there is a touch of freeplay between the release bearing and clutch plate the clutch doesn't quite completely disengage with the pedal to the floor. If I extend the slave pushrod a little bit the clutch will disengage but the release bearing stays against the clutch plate. It's like the pedal doesn't have quite enough travel, or the master doesn't have quite enough volume. Weird indeed.
 
I agree with SWBFREELOADER... check pedal pushrod to master cylinder distance ..( pedal height) you should get just a touch of movement of the pedal before it pushes the piston in the master cylinder .. as for the rod and not getting the right clearance for the clutch to feel right ... well join the club of the confused with that .. i have threaded the end of the rod that goes up against the piston on the slave cylinder and used a domed nut to give me more clearance .. but i have noticed recently that i think the adjustment on the master cylinder end is not right .. i have a little bit more pedal movement than i should have .. so one day i will readjust that rod ..
 
I agree with SWBFREELOADER... check pedal pushrod to master cylinder distance ..( pedal height) you should get just a touch of movement of the pedal before it pushes the piston in the master cylinder .. as for the rod and not getting the right clearance for the clutch to feel right ... well join the club of the confused with that .. i have threaded the end of the rod that goes up against the piston on the slave cylinder and used a domed nut to give me more clearance .. but i have noticed recently that i think the adjustment on the master cylinder end is not right .. i have a little bit more pedal movement than i should have .. so one day i will readjust that rod ..
I've adjusted the rod at the master cylinder to have the least freeplay I could give it - I think. Maybe the bit of play I'm feeling is worn linkage and I'm actually pushing the piston up into the bore when at rest? Hmmm... I'll have to check when I get home from work. I'll try to pull back the boot and see where the piston is.
 
I had no problem with the 2a box ..and the feel of the clutch .. but once i had put the old series 2 box back in i did .. now .. did i use the push rod from the slave from the 2a box or from the 2 box .. i think the problem arises from different length of rods ... slave cylinder ... even the clutch unit itself and maybe the thickness of the clutch plate all combine to either A.. it works with the rod that is fitted ..or B.. you end up having to find a way to lengthen the slave push rod .. some times a nut or even as seen recently a brake pipe end fitting
 
It's like the pedal doesn't have quite enough travel, or the master doesn't have quite enough volume. Weird indeed.
It sounds very much like the master and slave are mis-matched (master too small diameter or slave too large).
I dont know what the options are for cylinders (that would be incorrect but still fit), but can you double check the part numbers or check the bores..?
 
It sounds very much like the master and slave are mis-matched (master too small diameter or slave too large).
I dont know what the options are for cylinders (that would be incorrect but still fit), but can you double check the part numbers or check the bores..?
This is exactly what I was thinking. I'm not entirely sure I've got the correct master cylinder on there. It's got a 3/4" bore but it seems like maybe a 7/8" would maybe be more appropriate. I'm going to do a bit more research...
 
Well, as a point of reference, I have a standard 2A slave and an S3/early coiler master. I'm running a 3/16" line but that wouldn't affect anything it just made the issue with unions and pipes easier :p
My slave side actuation rod is a custom length based on the fact I am not using the spacer block under the slave cylinder (which is said to be required when you use a diapragm clutch with the OG length pushrod). My rod was toast anyway so I made a new one that fitted my needs.

I would sort out any free play issues on the pedal end and be 100% sure you're not trapping air in the system before you go crazy swapping parts.
 
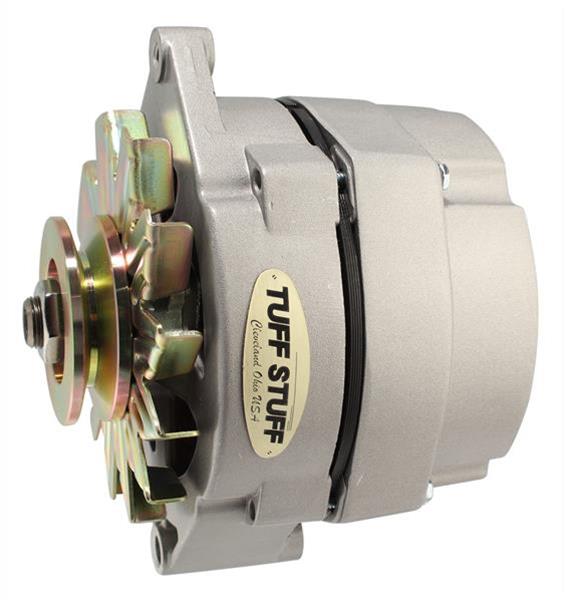
I mentioned in a previous post that I'm replacing the stock Lucas alternator with a higher output and more locally available GM AC Delco unit. I think it was this one:


So "AC" is for Albert Champion of spark plug fame and Delco is the Dayton Engineering Laboratories, circa 1909. It's a 'Merican company yes but not entirely without history and deserving of respect. They've made a good product for over a hundred years. Admittedly the Tuff-stuff brand has remade it with their own spin on it but it's got good bones. It's bigger and is a bit of a tight fit in there but I'll make it go. After some test fitting it looks like I'll be able to use the stock LR upper support/clamp bracket and an existing 5/16" hole through the block for a lower pivot mount.
20240429_001446.jpg

Because the hole in the block is 5/16" and the hole through the alternator is 3/8" I needed to make a special rod. I turned a 3" section of a piece of 3/8" diameter steel rod down to 5/16" and die-cut a fine thread on the end. I also die cut a 3/8UNF thread on the other end. For peace of mind I made a lower support bracket from 1 x 1/8" aluminum flatbar to keep the fan belt tension from bending the lower pivot rod. I also turned a 1" long spacer to place the pulleys in line properly. I cut it a touch short so I could adjust the spacing with washers. All of that was done on the fly, taking measurements and trying fit as I went. Before long I had it all made up and it seems to work. Mechanically the new alternator is in.
20240428_233212.jpg

20240428_233859.jpg

20240429_002910.jpg

20240429_002932.jpg

So now I just have to wire it up which shouldn't be a problem as I've already accounted for it in the rebuild of the wiring harness. Stroke another thing off the whiteboard! šŸ˜€
20240429_004302.jpg


As usual I had a movie going on the TV while I worked. Google must know I'm into Land Rovers as it queued up a random movie which when I looked up at it was showing me a sweet Series 1. Nice!
20240429_001628.jpg
 
Last edited:
So I walked around the project tonight and noted on the whiteboard some of the little things that still need doing. Considering that I tend to take care of one item per evening this might take a while! Time to get busy. If I'm going to drive this beast this summer I'd better get at it!
20240429_012710.jpg
 
Back
Top Bottom