When you start the 2.25 diesel engine from cold in a Series Landy, you must first use the heater plugs to warm the cylinder prior to turning the engine over. Diesel engines rely on the friction of compression to ignite the fuel/air mixture, and the heater plugs aid the ignition of the mixture when the engine is cold, by using them for about ten or fifteen seconds. The engine will start from cold without the heaters being used, but you may find that you have to crank it over and over quite a few times before it will fire.
So, correctly working heater plugs are something of a necessity, especially in cold weather!
There are two types of plugs fitted to the series Landy…the early type
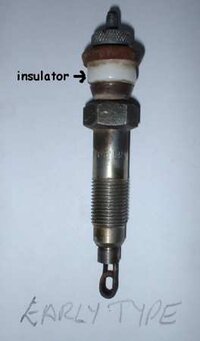
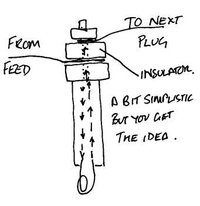
which are wired in series as in the drawing.

The other type are an after-market ‘upgrade’ and are of the type fitted to Defenders, and they look like this…
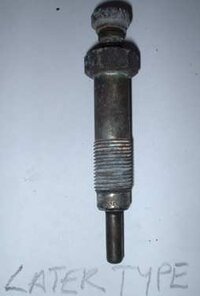
They are wired directly from the switch, and are wired from a common feed thus….
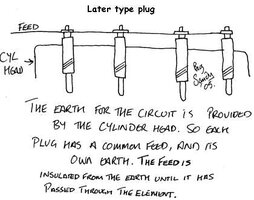
The advantage of the later type, as I am sure you will have spotted already, is that you can have one plug fail, but the rest will continue to work. With the early type, if one fails, none of them work.
So….How to test them?? First of all, does the light on the dash work when you turn the key or use the switch? If the light is working, it will glow dully and get steadily brighter. If the bulb does not light, then either the bulb is not working (though this won’t affect the operation of the heater plugs) or there is a fault in either the ballast resistor
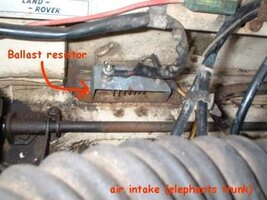
or the heater plugs and wiring. Assuming the bulb is okay, no light would indicate an open circuit. If the light glows very brightly however, this would indicate a short in the system.
A simple way to test the heaters operation is to watch the ballast resistor when the circuit is used; It will get hot and probably glow…this would indicate that everything is working. The coil of the ballast resistor reduces the voltage down to around 6 volts…(the early plugs are rated at 1.7v) and the voltage present gets less and less as you go down the circuit through each plug. If you were to test the voltage at the last plug when they were in use, it would be very low, less than 1v. The later type of plugs are 12v, and have no ballast resistor.
So, assuming the resistor is cold, and the light didn’t light, check the operation of the resistor by using a test lamp or volt-meter from the right hand terminal, to earth. When the key is turned, the test lamp should light, which would indicate the resistor is working. If not, then test the other end of the resistor using the same method to see if power is getting to the resistor, if the lamp does not light, the wiring to the resistor is faulty.
Assuming the resistor is okay, we now test the plugs themselves.
Normally, they require no maintenance; they either work or they don’t! So, the only time you will need to mess with them is if you suspect a fault. It is possible to test the plugs without removing them…. Connect one lead of a 12v test lamp to the positive terminal on the battery, and the other end to the earth lead terminal at the plug nearest the radiator.

If the test lamp fails to light, then the earth lead is at fault. If the lamp should light, move the test lamp lead to the other, interconnecting, terminal.
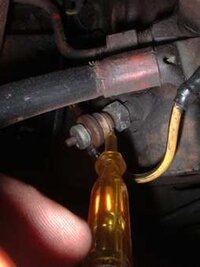
If the lamp remains unlit, then a broken element in the heater plug is indicated, and that plug will have to be replaced. If the lamp lights however, move to the next plug in line, and repeat the procedure testing the leads and plugs in the same manner until you find the plug at fault.
Once you have found the plug at fault, remove the knurled nut from the plug, followed by the lead, washer, and then the insulator. Then remove the other lead. Notice at this point, you cannot wire them up the wrong way, as the terminal ends are a different size!
Remove the plug using a suitable deep socket or spanner and replace it with a new one.
Ideally, if the new, or replacement, plug has been rattling around in the tool box, you should test it before fitting it. Connect the test lamp to a 12v battery, and connect it to the plug as in the photos below.
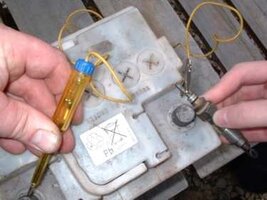
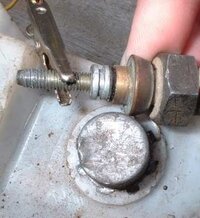
If the bulb does not light then there is an internal fault, or a faulty element in the plug indicated (open circuit), and that plug should be replaced. DO NOT test these plugs in this manner without a test lamp in the circuit, as they will burn out very rapidly, and the heater element will burn away in front of your very eyes!
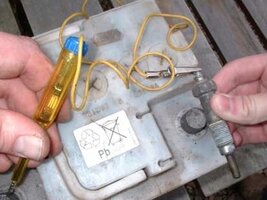
Testing the later type of plug is possible by removing it and testing with a battery as in the photo below.
Failure to light the lamp would indicate a fault in the plug, and it will need to be replaced.
Hopefully after all this, you should now have working heater plugs!
So, correctly working heater plugs are something of a necessity, especially in cold weather!
There are two types of plugs fitted to the series Landy…the early type

which are wired in series as in the drawing.


The other type are an after-market ‘upgrade’ and are of the type fitted to Defenders, and they look like this…

They are wired directly from the switch, and are wired from a common feed thus….

The advantage of the later type, as I am sure you will have spotted already, is that you can have one plug fail, but the rest will continue to work. With the early type, if one fails, none of them work.
So….How to test them?? First of all, does the light on the dash work when you turn the key or use the switch? If the light is working, it will glow dully and get steadily brighter. If the bulb does not light, then either the bulb is not working (though this won’t affect the operation of the heater plugs) or there is a fault in either the ballast resistor

or the heater plugs and wiring. Assuming the bulb is okay, no light would indicate an open circuit. If the light glows very brightly however, this would indicate a short in the system.
A simple way to test the heaters operation is to watch the ballast resistor when the circuit is used; It will get hot and probably glow…this would indicate that everything is working. The coil of the ballast resistor reduces the voltage down to around 6 volts…(the early plugs are rated at 1.7v) and the voltage present gets less and less as you go down the circuit through each plug. If you were to test the voltage at the last plug when they were in use, it would be very low, less than 1v. The later type of plugs are 12v, and have no ballast resistor.
So, assuming the resistor is cold, and the light didn’t light, check the operation of the resistor by using a test lamp or volt-meter from the right hand terminal, to earth. When the key is turned, the test lamp should light, which would indicate the resistor is working. If not, then test the other end of the resistor using the same method to see if power is getting to the resistor, if the lamp does not light, the wiring to the resistor is faulty.
Assuming the resistor is okay, we now test the plugs themselves.
Normally, they require no maintenance; they either work or they don’t! So, the only time you will need to mess with them is if you suspect a fault. It is possible to test the plugs without removing them…. Connect one lead of a 12v test lamp to the positive terminal on the battery, and the other end to the earth lead terminal at the plug nearest the radiator.

If the test lamp fails to light, then the earth lead is at fault. If the lamp should light, move the test lamp lead to the other, interconnecting, terminal.

If the lamp remains unlit, then a broken element in the heater plug is indicated, and that plug will have to be replaced. If the lamp lights however, move to the next plug in line, and repeat the procedure testing the leads and plugs in the same manner until you find the plug at fault.
Once you have found the plug at fault, remove the knurled nut from the plug, followed by the lead, washer, and then the insulator. Then remove the other lead. Notice at this point, you cannot wire them up the wrong way, as the terminal ends are a different size!
Remove the plug using a suitable deep socket or spanner and replace it with a new one.
Ideally, if the new, or replacement, plug has been rattling around in the tool box, you should test it before fitting it. Connect the test lamp to a 12v battery, and connect it to the plug as in the photos below.


If the bulb does not light then there is an internal fault, or a faulty element in the plug indicated (open circuit), and that plug should be replaced. DO NOT test these plugs in this manner without a test lamp in the circuit, as they will burn out very rapidly, and the heater element will burn away in front of your very eyes!
Testing the later type of plug is possible by removing it and testing with a battery as in the photo below.

Failure to light the lamp would indicate a fault in the plug, and it will need to be replaced.
Hopefully after all this, you should now have working heater plugs!
