I finally got round to sorting out my reversing light, which hasn't worked since I bought the Land Rover.
I had bought a replacement light unit some time ago, but hadn't gathered enough moral fibre to attempt the job before... I hate vehicle electrics, they are the spawn of the devil!
I fitted the new light fitting, without much drama, and reconnected the bullet connectors, but the nice new shiny light didn't shine
Testing with a meter I found no volts - which is strange, 'cos I thought I remembered testing it before and finding at least twelve...
So, It must be the switch then, bugg3rit...
My thanks to Dave_T for his response to my plaintive query in the Defender forum, asking where I would find the reversing light switch on a 1997 Tdi Ninety, as I had had a cursory look underneath, and through the plate under the centre seat, without success.
The Haynes manual is not helpful, either... it is not at all clear where the switch is located.
For those of you that don't know, I will reveal the secret...
The reversing light switch on a 300 Tdi Defender (which uses the R380 gearbox) is on the passenger side of the main gearbox near the back, and towards the top. In relation to the rest of the vehicle, it lies just forward of the front of the seatbox.
Hopefully this will be of some help to those that come after, as I searched this forum and others for some time without finding a clear answer.
As to accessing the damn thing, well that's another matter, as I shall now reveal...
I had a cup of tea and a number of ciggies... some of you may want to drink something stronger...
I couldn't put it off though, and it hadn't magically fixed itself, so I began.
First job is to take out the seat squabs. They need to come out anyway for access, and as I have recently expended some effort in cleaning mine, I didn't want to get them mucky.
Second job is to remove the fusebox cover, as it gets in the way of all the soundproof matting, carpets, transmission tunnel etc. which have to come off.
Take off the plates under the centre seat and drivers seat, as you will need to get at stuff underneath.
I removed the floor mats, and then the moulded soundproof covering of the transmission tunnel and the central bit of the forward bulkhead.
This reveals the transmission tunnel cover which is a shaped aluminium pressing screwed to the floor plates.
Then I released and pulled up the gaiter surrounding the main and transfer gear levers. I found it is not necessary to remove it altogether.
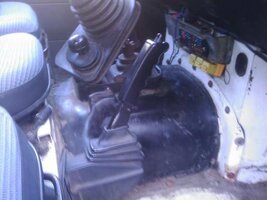
The Transfer gear lever needs to be put in the low-box position, to allow the transmission tunnel to clear it.
I unscrewed the self-tappers which hold the transmission tunnel in place. This took some swearing and effort, as they were well rusty, but using a flat-bladed screwdriver and FBH I persuaded them all to come out.
I then found, after some grunting and pulling, that the tunnel cover doesn't clear the handbrake mounting...
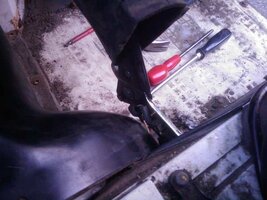
So, release the handbrake.
At this point I should perhaps mention that I was working on flat, soft ground such that the Landy didn't roll away... You may wish to check this, before moving on...
Remove the gaiter around the handbrake lever. (I found you could just pull it up from the bottom to give enough room). Then undo the two bolts that hold the handbrake assembly to the front of the seat box. You will need to get at the back of the bolts through the panel under the driver's seat.
There is enough slack on the handbrake cable to pull the whole assembly forward and away from the transmission tunnel.
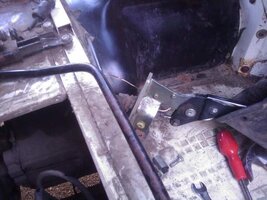
It should now be possible, with some effort and trapped fingers, to remove the transmission tunnel cover - without breaking the relays on the fusebox, I might add...

Behold, a very mucky R380 gearbox in all its naked glory!!
Moving round to the passenger side of the vehicle, you should now be able to see the reversing light switch, on the side of the gearbox, just in front of the front edge of the seatbox. (see nice circle in pic!)
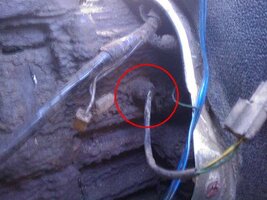
I found the wiring plug, and disconnected it, but as I did so, I found the root cause of my problem... the wire from the plug to the light was broken off where it goes into the loom, so all my volts were falling out of the wire...
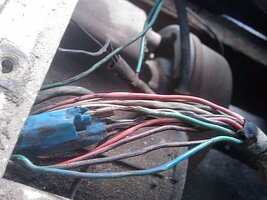
You may notice that some kind person had been there before me and mucked about with the wiring at some time, as I don't think Land Rover ever used pretty blue insulating tape on their looms, I may be wrong.
This may have contributed to the present failure, as the wire had been cut and rejoined using a crappy crimped spade connector.
I tested the reversing switch with my meter, just in case, but it was fine, so I rejoined the wire and soldered the joint, and then re-insulated it in proper self-amalgamating tape (good stuff, that).
Ooh, look, it works!
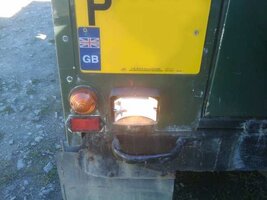
As Mr Haynes says "refitting is the reverse of removal"....
HA! He never mentions the pain and anguish associated with trying to shove a curved bit of transmission tunnel back where it came from..
Still, I'll be alright when I get a blood transfusion...
Eventually, however, everything was back together, and the light still worked... BONUS!
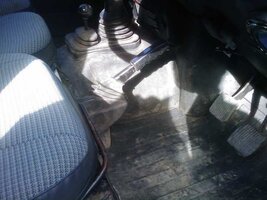
Another successful job completed, and I can go and have a lie down, It takes it out of you, this Land Rover ownership lark!
I had bought a replacement light unit some time ago, but hadn't gathered enough moral fibre to attempt the job before... I hate vehicle electrics, they are the spawn of the devil!
I fitted the new light fitting, without much drama, and reconnected the bullet connectors, but the nice new shiny light didn't shine
Testing with a meter I found no volts - which is strange, 'cos I thought I remembered testing it before and finding at least twelve...
So, It must be the switch then, bugg3rit...
My thanks to Dave_T for his response to my plaintive query in the Defender forum, asking where I would find the reversing light switch on a 1997 Tdi Ninety, as I had had a cursory look underneath, and through the plate under the centre seat, without success.
The Haynes manual is not helpful, either... it is not at all clear where the switch is located.
For those of you that don't know, I will reveal the secret...
The reversing light switch on a 300 Tdi Defender (which uses the R380 gearbox) is on the passenger side of the main gearbox near the back, and towards the top. In relation to the rest of the vehicle, it lies just forward of the front of the seatbox.
Hopefully this will be of some help to those that come after, as I searched this forum and others for some time without finding a clear answer.
As to accessing the damn thing, well that's another matter, as I shall now reveal...
I had a cup of tea and a number of ciggies... some of you may want to drink something stronger...
I couldn't put it off though, and it hadn't magically fixed itself, so I began.
First job is to take out the seat squabs. They need to come out anyway for access, and as I have recently expended some effort in cleaning mine, I didn't want to get them mucky.
Second job is to remove the fusebox cover, as it gets in the way of all the soundproof matting, carpets, transmission tunnel etc. which have to come off.
Take off the plates under the centre seat and drivers seat, as you will need to get at stuff underneath.
I removed the floor mats, and then the moulded soundproof covering of the transmission tunnel and the central bit of the forward bulkhead.
This reveals the transmission tunnel cover which is a shaped aluminium pressing screwed to the floor plates.
Then I released and pulled up the gaiter surrounding the main and transfer gear levers. I found it is not necessary to remove it altogether.

The Transfer gear lever needs to be put in the low-box position, to allow the transmission tunnel to clear it.
I unscrewed the self-tappers which hold the transmission tunnel in place. This took some swearing and effort, as they were well rusty, but using a flat-bladed screwdriver and FBH I persuaded them all to come out.
I then found, after some grunting and pulling, that the tunnel cover doesn't clear the handbrake mounting...

So, release the handbrake.
At this point I should perhaps mention that I was working on flat, soft ground such that the Landy didn't roll away... You may wish to check this, before moving on...
Remove the gaiter around the handbrake lever. (I found you could just pull it up from the bottom to give enough room). Then undo the two bolts that hold the handbrake assembly to the front of the seat box. You will need to get at the back of the bolts through the panel under the driver's seat.
There is enough slack on the handbrake cable to pull the whole assembly forward and away from the transmission tunnel.

It should now be possible, with some effort and trapped fingers, to remove the transmission tunnel cover - without breaking the relays on the fusebox, I might add...

Behold, a very mucky R380 gearbox in all its naked glory!!
Moving round to the passenger side of the vehicle, you should now be able to see the reversing light switch, on the side of the gearbox, just in front of the front edge of the seatbox. (see nice circle in pic!)

I found the wiring plug, and disconnected it, but as I did so, I found the root cause of my problem... the wire from the plug to the light was broken off where it goes into the loom, so all my volts were falling out of the wire...

You may notice that some kind person had been there before me and mucked about with the wiring at some time, as I don't think Land Rover ever used pretty blue insulating tape on their looms, I may be wrong.
This may have contributed to the present failure, as the wire had been cut and rejoined using a crappy crimped spade connector.
I tested the reversing switch with my meter, just in case, but it was fine, so I rejoined the wire and soldered the joint, and then re-insulated it in proper self-amalgamating tape (good stuff, that).
Ooh, look, it works!

As Mr Haynes says "refitting is the reverse of removal"....
HA! He never mentions the pain and anguish associated with trying to shove a curved bit of transmission tunnel back where it came from..
Still, I'll be alright when I get a blood transfusion...
Eventually, however, everything was back together, and the light still worked... BONUS!

Another successful job completed, and I can go and have a lie down, It takes it out of you, this Land Rover ownership lark!
