• Welcome to the Land Rover UK Forums

    You are currently viewing the site as a guest and some content may not be available to you.

    Registration is quick and easy and will give you full access to the site and allow you to ask questions or make comments and join in on the conversation. If you would like to register then please Register Now

My D3 Project

@Big Sandy , would it be possible plse to change the title to “ My D3 project “. Plse

Hope that’s ok and u didn’t mind me asking , just thought then I can post everything in one place,

Many thks as always

Ps, hopefully it will also help others in the future
 
@Big Sandy

Am after a massive favour pretty plse with a cherry on top

Is there a way if this can be incorporated into my other thread please , the D3 gauge panel one , so everything is in one place

Apologises being a pain ,many thank as always
 
It's waaay over my head (some would say it's a vacuum in there too...) but I think that's impressive, shows what you can do if you put your mind to it.

Shucks , ur have me believe I know what I’m doing next , lol

Think a lot of the knowledge is from my boiler days when I had to find gas leaks etc, making up rigs so could isolate different sections , etc

Once I start testing will post up some more piccies ,

Thks again
 
Bonnet letters now removed , found using a rubber wheel got the sticky backing off very easily , along with some compound to help clean the edges off

Think I’ve got to go over it again and the sun was right over top

Don’t know what peeps think

The scuttle panel and A trim pillars I painted am pleased with

Finally got round to cleaning the windows properly , used some window cleaner and Stanley blade , has helped a lot with them not sticking anymore

Found a trim had come loose , think that might have been a slight whistle noise I heard in the motorway , just tapped it back properly

Got to sort out the fading door handles at some strange , might use a hobbyist spray gun to do them

E6FC9544-2B90-41AA-9178-B6A5236ECBA8.jpeg
3CDB0D3E-CE6F-42BB-9958-BF0CC5E880E3.jpeg
666F1766-B2BC-4955-8F0D-FB31EE9828EB.jpeg
51B8332D-2080-46DF-B1A9-D03FEF807A38.jpeg
9FDDE330-8D37-4BFE-BF26-B18A042F5C1A.jpeg
16BF4B5F-026C-45C7-8A40-EC6B7EE181B5.jpeg
995D8E05-6BB5-435F-B4DA-3DF6951C450B.jpeg
AFCB4E44-3C65-4015-A1D0-23AB995EC76C.jpeg
F22EC904-CC9A-4B4F-8180-24AE8A2DB3AB.jpeg
91F0E199-F0A8-40F1-B51F-FE56106EB579.jpeg
0A478C2E-B292-4E58-807D-EB038EBD1EF9.jpeg
7F65E937-4DC7-4EE4-B882-E52BEBAE4186.jpeg
0C28ABCB-EE37-437A-85C9-742E03BF7509.jpeg
 
As a side note this is what the engines look like when there out the vehicles

The small belt at the rear is the one that a lot of garages have issues with and insists the body needs to come off, which isn’t true , watched the rear belt being replaced by a skilled mechanic in less than an hour , it’s the fuel pump belt and that one isn’t timed ,however it is timed on the D4

So wished to give a heads up the body doesn’t need to come off, if a garage tells u otherwise there telling u porkies

4F404CA5-9ACE-481C-9D3A-A3835336729E.jpeg
37EB41E9-1600-479E-9490-A3B10DC2C550.jpeg
2175BF24-6319-43D9-BA54-AEE5EE3E76DA.jpeg
A1CBE807-F3D5-47D2-917C-FA50CDFDC56C.jpeg
A21D5F21-F111-49D5-8EAC-30B9FA9F3F7B.jpeg
22D1329D-9693-4EDA-87ED-B728C41FBAB4.jpeg
4D8C8A72-CEA8-4068-8CE7-13F958180200.jpeg
 
Also very fiddly when I installed a twin battery setup , there very power hungry , last about a month of not used

Plug mine into a ctek on my drive, installed a charging point on the front of the house and changer in hallway

6285279B-0268-4238-81F9-433AFB9F4348.jpeg
0DF9F684-1C0A-4D30-8F08-C7FF0F6F7FA3.jpeg
45507DAF-360D-4EDB-8C06-47CCD3B7F0BE.jpeg
7CC6C045-EB56-4265-947D-007CE9243CE3.jpeg
A5B96DBD-B787-400C-8F91-011D9F778CB3.jpeg
CE80D28E-E9F8-46C6-AA62-E7A58586903E.jpeg
FA2CB5D7-B978-4387-B551-8FE909E5ABEF.jpeg
AF731B5D-9191-48C6-BF43-9073024A5ED8.jpeg
 
So tested the aircon today to try and find the leak, put 40psi in the system, nothing didn’t drop at all

Couldn’t get to the back of the condensor so will have to remove air inlet ducting etc to test it

Sprayed nearly every ac joint with soapy water

Might be a different story when I put it under vacuum

Tested the rig first in some water, there were a few leaks which were easily resolved

Do have a new condensor but prefer to find the leak before removing the old one

08B5B0D0-5882-4979-8B90-9D4060287CAC.jpeg
AAF53C6E-30F4-4DF3-B3FA-67BF3448D0EB.jpeg
A65D66AF-D706-48E1-8CA6-5AA208B26908.jpeg
9F698A6D-E8E6-4FA4-A69E-3AC72F129F87.jpeg
E3FB932A-CC7B-411B-87E0-21E6668E5DBE.jpeg
E953521B-F815-475C-94EA-439CCACBC0EB.jpeg
8A10AE96-5658-46B3-87ED-180405EE2250.jpeg
 
Also removed the passengers side headlight , can see some condensation inside

On the back of the headlight there’s 3 x tube holes that are blanked so thinking of drilling the holes and installing some tubing on the back to help with the condensation

7B59EE98-2A24-4FB3-85F3-B4B1F35974C0.jpeg
C00774A1-B185-46BF-B040-3744EDAE07AA.jpeg
F2659E67-B423-4FB7-B965-9A1EAD94F0E8.jpeg
E016C7FE-93F2-4474-B177-F3E8BA96525C.jpeg
 
Gotcha , found the ac leak , is between the condensor and cooling rad

Can just see the bubbles, so new condensor it is, Have one already

Needed to prove to myself 100% what was at fault

That’s saved a good few hundred quid of what garages were quoting me to look for the leak

Happy days

22695685-AC63-41EB-8153-3514C8BA4D9B.jpeg
0E56341F-D346-49B7-8BC9-67DB0D58B827.jpeg
 
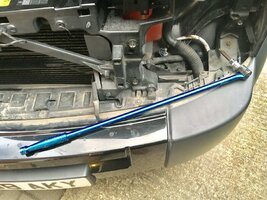
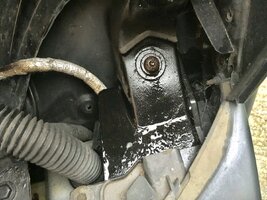
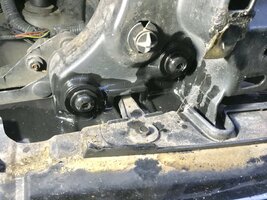
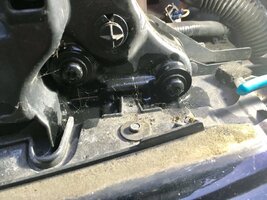
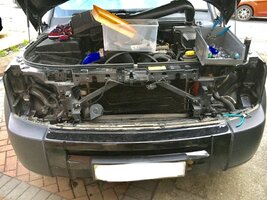
Well this is far as I’ve got

, can’t get those large T40 torx to budge , have soaked them in plus gas and will leave them over night

Any tips please apart from cutting them off with a dremel plse
Big Cry


9D98B10D-D935-45D5-BB61-4F1E48FFFAE8.jpeg
DC11475F-B70E-4E0B-9B6A-F1871F8475E8.jpeg
26293C8E-0FCD-4198-A30E-FF546DF162CD.jpeg
BB7F50A3-4027-4410-A620-010C7BAB0A48.jpeg
E3FE5A2D-7CDE-4884-A22F-6CA0CE51D035.jpeg
BF354ACD-B36B-428C-B1E8-B6D0FCC794E2.jpeg
 

Attachments

  • 9D98B10D-D935-45D5-BB61-4F1E48FFFAE8.jpeg
    9D98B10D-D935-45D5-BB61-4F1E48FFFAE8.jpeg
    309.9 KB · Views: 181
  • DC11475F-B70E-4E0B-9B6A-F1871F8475E8.jpeg
    DC11475F-B70E-4E0B-9B6A-F1871F8475E8.jpeg
    283.6 KB · Views: 175
  • 26293C8E-0FCD-4198-A30E-FF546DF162CD.jpeg
    26293C8E-0FCD-4198-A30E-FF546DF162CD.jpeg
    272 KB · Views: 181
  • BB7F50A3-4027-4410-A620-010C7BAB0A48.jpeg
    BB7F50A3-4027-4410-A620-010C7BAB0A48.jpeg
    235.1 KB · Views: 170
  • E3FE5A2D-7CDE-4884-A22F-6CA0CE51D035.jpeg
    E3FE5A2D-7CDE-4884-A22F-6CA0CE51D035.jpeg
    296.6 KB · Views: 173
So the torx 40 is now knackered , do have an impact gun that’s 240 v / 450 nm

Wondering if that may help

The threads do protrude about 1/2 inch through so wondering if I can get a dremel on the 6 x torx bolts to clean the threads to aid there removal

Just taken a step back to try and work out what the best course of action is , got to now hunt for another torx bit

Any ideas please , pretty plse with a cherry on top, lol

E140E2C0-1443-4002-AEC1-3A3A664E8176.jpeg
70157DBD-BFF4-425E-BF26-255CA68CAD2D.jpeg
 
If you have room give the head of the Torx bolt a good couple of wacks then try to tighten slightly, then try to loosen, you might need to do it a few times, that is the method I was taught way back in the 60s, failing that a bit of heat if nothing flammable in the vicinity, and of course a good quality torx bit. Colin
 
Back
Top Bottom