• Welcome to the Land Rover UK Forums

    You are currently viewing the site as a guest and some content may not be available to you.

    Registration is quick and easy and will give you full access to the site and allow you to ask questions or make comments and join in on the conversation. If you would like to register then please Register Now

Ninety V8 Auto conversion, A few small tech questions.

Well this project might grind to a halt after all anyway.

The trans tunnel still won't fit. It looks like i have to find an Diesel tunnel. and seat box. I'll have a measure up and see. This is very very very frustrating. Ahh well i might go fit the bulkhead removal bar tomorrow and release some anger by cutting the bulkhead out.

I have some piccies i'll up load later.
 
The v8 auto tunnel is the same as the R380 tunnel and components, I have them on order for mine at present mine has the lt95 parts modified, seatbox needed a little trim for the lt230
 
Nope not LT85 tunnel Nor R380 I'm talking LT77!

I have had to change the Apron and the tunnel, There is also the mating lip to the the seatbox. I have had to remove the lip from the seatbox and then using a scrap seabox remove the lip and associated panel work.
This is then grafted onto my seatbox.
This then caused the new metal work to hit the panel. That's why the R380 and LT85 have that domed area under the handbrake lever. The T box Hi / Low assembly would hit the seatbox because it is moved 2 odd inches forward than the LT77 diesel position.
I have now boxed over the selector assembly and lightly modified the tunnel to miss the HI Lo linkage and it is going to be tight on the passenger side for the Gear cable. Then this means i know have the TDI floor pans in place and again the Drivers side has needed a little cutting and bending to miss the Difflock linkage and also the Hi / Lo assembly on the T box!

For those reading this i hope my experience has been a one off as after all It was suppose to be as i was told by ashcrofts and straight fit.
 
Ok....

Since last week i have...

finished fitting the tunnel and the floor pans.. Involving lots of bodging that i am not very proud off.
The Interior bulkhead has gone and the removal bar fitted. This then freed up space and allowed the Ashcroft tunnel to be fitted in place.
The Electrics required awakening. Lots of corroded connections and required plenty of contact cleaner, emery paper and patience.
The wipers had a new new park switch and still refuse to park on occasions.
The Rear numberplate light fell to pieces so a last minute replacement needed.
There was a couple of patches needed on the rear crossmember. (A legacy of the fact it spent many years nose first in a conifer hedge).
The wheel arch spats were fitted.

and yes today i went and had an MOT and passsed. :)

Now the fun begins in improving and a few custom mods to do.
 
Myninety010_zps5ad5bd39.jpgMyninety005_zps7d4b61ca.jpgMyninety001_zps22e03d43.jpg

Whilst the first part of the project is done i have a long way to go.

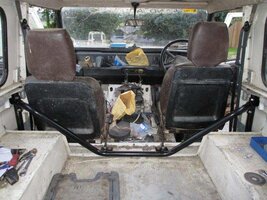
As you can see the interior bulkhead is history. Britpart do a removal bar which does fit after a little coaxing. (Nothing major just remember the old way of doing all the bolts up loosely first then tightening)
It wasn't done purely to allow the seats to recline further it was more to the case that the Ashcroft auto tunnel would have to be trimmed to fit if the standard bulkhead was left in.

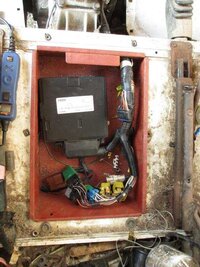
Next you can see the Underseat tray. This houses the ECU and main relays out of harms way. In the future any sensitive kit can be located here.

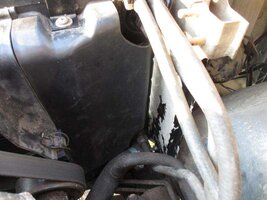
Ahh the Famous cowl. Here shows why the cutouts are vital to make it fit. As you can see it is a tight fit and there is a lot of pipework.

I have (with my little helpers) done the conversion to TD5 instruments. So i have a speedo that doesn't wander and also teed into the feed provides the Vital speed input into the ECU.
Ohh and the Warning lights and Instrument illumination are far better than the older models.

For those who have done this mod then i don't suppose you can help in why my Temp gauge doesn't work. I have wired as per the Retro anaconda website and i have the 300TDI sender. Still it doesn't move when the engine warms up? With the ignition on it does move to the bottom of the blue and then it stays there! If you earth the wiring then the needle moves. I have replaced the sender to no avail too. Cleaned all the connections and still no joy! My heater isn't all that warm is that a ninety thing or maybe the thermostat is stuck open?

As i progress i'll put a few more piccies up as i add on the goodies.

My next major improvement is an LPG system.
 
My heater isn't all that warm is that a ninety thing or maybe the thermostat is stuck open?
First thing to work out is whether the engine is getting hot - if not then the heater won't be very good.
Other than that, the matrix may be past it's best (they corrode and lose their finning like the main rad, block up, get coated in dirt, etc) or the internal flaps may be allowing cold air to bypass the matrix (adjust the cables properly). In good working condition, these heaters are actually quite good, but when neglected for long enough ....
 
I have numerous V8 senders if you would like to try them.

Quite agree, the Defender heater, especially with a V8 pushing it, is a pretty effective unit. I think Western Recovery has written a pretty good explanation on how to set up the controls.
Another worthwhile investment is a laser thermometer, they are very inexpensive and they enable you to take spot temperatures all over the engine, or anywhere else for that matter. I found mine a great help when trying to find out what was going on with my engine, when I thought it was overheating.
 
Right it does look like the T stat is stuck open.

Removed the fan (it did put up a fight) and if you work it uphill then the needle will come off the blue part of the gauge (the heater does actually work nicely then). As soon as you level out or go down hill then the needle falls rapidly back down the blue.
Soo looks like a new stat is needed. As the water pump is a bit noisy then i guess it is time to do that too. I guess i won't be bored this weekend.
 
Ohh i haven't updated this for a while.

Where was i the past few months have flown by...

Right the Thermostat wasn't stuck It was missing in action. and to complement it the water pump decided that a week later it was going to join it's comrade in not working. Firstly it seized then worked then the seal went thus leaking profusely over the engine bay and steam cleaning the front cover.
So the Pump was replaced and onto the stat is when i discoverd it was missing! That really set alarm bells off as either it means the engine is not healthy or perhaps the original rad wasn't up to the job. Time will tell.
anyhows with a new pump and stat installed the temp guage still didn't work. One new sender and new bullet terminal on the wire and the temp gauge is happy, I did wonder as to fit the TD5 dash you do have to rewire it to the ROW (rest of world spec).

After a little while in use i would have to say that it is one of the top modifications that can be done to any early Ninety, One ten, One two seven and early Defender models. The whole dash is a lot more easy to read and understand at a glimpse. The speedo is rock steady and the LED warning light display is just great too.

October continued with trying to tie down a running issue that would be well know to many a V8 EFI owner Unsteady idle, and Going rough when selecting D or R
The Problem:
It would idle cold no problem get it warm and the fun would begin manifesting itself mainly in N or P the revs would be up and down and frequently would get soo low the IACV (Idle air control valve AKA the stepper motor) Would have to open one hell of lot and bring the revs back up.
It would go very low revs and very lumpy then through the air filter you could hear the extra air intake as it tried to bring the revs back up.
The fix:
Well a process of elimination began The WWW suggests that the IACV is at fault. So i took it out cleaned the bejesus out of it and lubricated it. then put a known good one on. Still the progress was slow and the problem was still there.
Next was the breather hoses. They were rather chocked and i had a loose connection so i had new ones 'in stock' so to say and fitted them. The flame trap was rather gunked up so this was cleaned in petrol and refitted.
The problem was less apparent but still there.
Running out of ideas i tried and adjusted the base idle this again helped but still didn't cure it.
Getting ticked off i reset the base idle and went to the only other item i could, Mechanics 101 says an engine needs fuel air and a spark. I hadn't yet touched the spark. Those mad enough here would of read this entire topic and know that i have changed the Dizzy due to the Amp dieing on me.
I got a timing light and discoverd the Timing was a little out. Cough 20 degrees cough
With the Dizzy out and reset using the correct marks and a timing light the engine now idles lovely and doesn't vary and doesn't bog down and go rough when selecting D or R RESULT!

My advice is go through all the trouble spots as said above and all those little gains help it run much better.

Later in October we had a little rain and going through a puddle caused me to end up coming home on 6 Cyls. To me this is very new territory, no i have owned V8's for a good few years and my faithful Lizi would never of thought about have a coughing fit when charging puddles. She would of plowed through small ponds like a lifeboat in a stormforce 11 conditions without issue. I have been wading rivers with water lapping the bonnet without hint of misfire, this all down to the mallory Dizzy and magnecor leads. As one small poxy puddle had this down on six and sounding like it was dieing.

So out with the wallet and there was no way the funds would go to a new dizzy but New Magnecor sports 60 leads and a new coil and new plugs have put her back on song for now. I just have to remember that when i try anymore water based heroics.

Early November soon came and more teething issues came to light, the alternator had decided that it was feeling left out. After all the water pump has been replaced so why not the alternator too?
It decided on a dark evening in the works car park to seize solid. So i got a hammer and WD40 and beat the #$&**$!# out of it. Got me home i'll tell you. But a new alternator was on the cards and the bank card was screaming for mercy after the previous weeks ignition system overhaul.
Now do i get a like for like or do i upgrade? Silly question.
Now here is a gem of info for you. On a serp 3.9 EFI out of disco or RRC you get a standard 100 amp alternator. Look for an early P38 and they have a 120 amp alternator this is a straight swap and a painless upgrade for more ampage. Well beside the cost of the new alternator.

Coming up to date the LPG system is on its way in, the tanks are in and i just have the plumbing to do. more on that soon.

Now i'm sure you all like bolting shiny stuff to the landy and me too. I have kept the winch from my old disco and it sits on a rather Sexy Devon 4x4 winch bumper it is a great combination. ohh yes a piccy will come soon as i have lusted after one of their bumpers for a while, And this week it shall be wired up ready for action and at least i shall wire the freedom switch wireless remote up too.
As from Devon 4x4 i have a mudconsole as they look good and i need a space for the CD player, winch controls, Switches for lights ETC..etc.. and the CB radio.

More updates to come on project ninety.....
 
If you want a waterproof V8 then the main thing to protect is the head of the coil . This was always a problem with 110 V8 in Australia , due mostly to the coil pack being relocated down by the side of the radiator, on OZ spec vehicles !? . Mine being UK spec it was up on top of inner wing . It was still a problem when deep wading creeks, so i made a lexan box that housed the coil , and also one for the amp pack . They were fully sealed , but had breather pipes that connected to the snorkle system . I tested by power washing the engine , with a fire hose ! I was retained firefighter at the time so was easy to arrange . Never missed a beat , and was subsequently waded on multiple occasions with total reliability. I also sealed the distributor , and fitted a breather hose to that . HTSH
 
If you want a waterproof V8 then the main thing to protect is the head of the coil
Ahhh, don't I know it. I think the problem I have at the moment is the coil lead from the Magnecor lead set I fitted doesn't have the right size carrot on it - so any damp is able to bridge the HT terminal and one of the LT terminals, and form a track down the nose. Been OK in summer, but it's running a bit rough again now it's turned damp :(
 
So did I - didn't stop the problem :( Need to find a carrot the right size, the main think is keeping all trace of moisture away from the nose of the HT connection and the tracking won't happen.
 
Actually, the "carrots" for MICC (aka Pyro) are purely decorative - to hide the bare copper cable sheath and gland. The gland itself is the moisture seal.

I was planning to either: pull one off an old set of leads I keep for those "just in case" moments, or buy one from Vehicle Wiring Products but I've not had any reason to order from them for a while. Either way it's yet another item on the "Round to It" list :rolleyes:
 
Back
Top Bottom