This article is written to provide a step by step 'How to' guide on how to do what the title suggests. It takes into consideration that not everyone is a skilled mechanic and will attempt to show that what might have been a perceived as a difficult job to attempt that it can in fact be done with the basic tools.
Anyone can chime in to assist with what I have/haven’t covered and with any other method/procedure.
Stuff needed in no particular order,music,beer,13mm ring spanner,13mm socket,14mm socket, 17mm socket or ring spanner, beer, large flat head screwdriver, small cold chisel ,extension bar, breaker bar, ratchet, beer, club hammer, bar for using as a drift, beer, pliers, vice grips ,plumbers pliers, beer, petrol, grease ,tab washers, flange gaskets, torque wrench(optional)normal hammer, small gas blow torch, beer ,and WD40...oh ....and don't forget beer.
The LR in question is a 1995 300tdi with 299000kms and the discs have never been changed before. Install discs/pads as an axle set.
So...without further ado..make sure you have a free afternoon devoid of children and wife (unless she offers to make tea at frequent intervals)..in the absence of tea, beer will be required along with music...
So rear offside first...or in my case rear nearside...who's correct?....
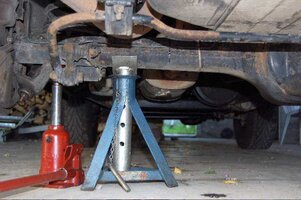
Loosen off wheel nuts and jack LR up and lower onto an axle stand. You'll need these as you'll be peeping in under the wheel arches to look where you'll be locating spanners......rock the truck too much it'll drop onto the back of your neck... Once you take the wheel off move it well out of the way as you'll not be needing it anywhere near you for quite some time!
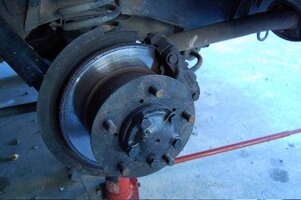
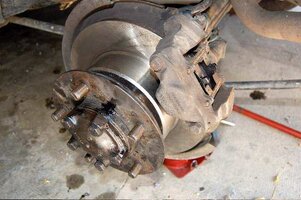
Now you will see the exposed hub, disc and calipers. A brake caliper is the big heavy looking bracket attached to the disc (here shown at the 2 o'clock position)which in turn is where the brake pads live. You see where the disc is thin when compared to the new one you have on stand-by. Note ....Drink beer.
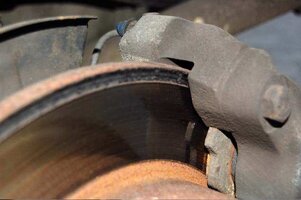
See how there's corrosion along the circumference
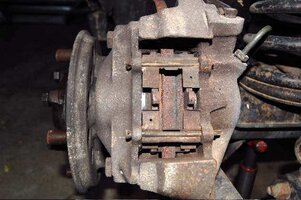
Brake caliper can be seen with the old pads in situ(centre of picture)complete with brake pad pins. Note drink beer.
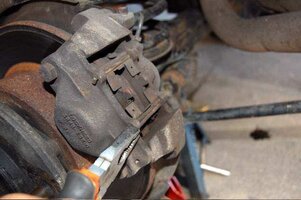
Pull out brake pins with pliers after bending the ends together to allow to do so ....there'll be light metal clips underneath the pins..take a picture or try and remember what way these are located..they'll be used again at the very end of the job....don't forget to bang your head on the wheel arch...this is allowed anytime from now on due to your impatience to get the job done
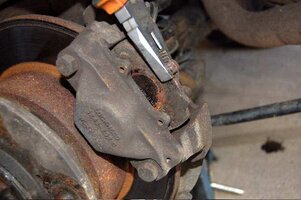
Pull out brake pads with the pliers... if the pliers slip off you can, if you're lucky, ding your fingers on inner guards....note it's too early to draw blood at this stage
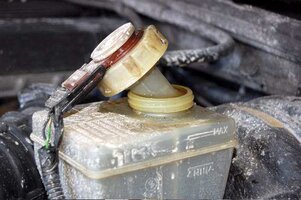
NB.....After removing the brake fluid reservoir top(under the bonnet) you can, if need be, lever the pads(with large flat blade screwdriver/ tyre lever) against the caliper to allow free movement to lift out the pads....the reason for the brake fluid reservoir top taken off is that if you lever the brake pads against the caliper it'll push the fluid back into the reservoir and the top off makes it easier to lever as there's no pressure to contend with.

Look behind caliper and see, close to the axle, 2 castellated bolt heads. These do not require a special tool but only a 13mm ring spanner or socket. keep the spanner/ socket under tension and whack it with a hammer to loosen it from the caliper threads...It'll be a hard push if you don't do this. Drink beer and change music
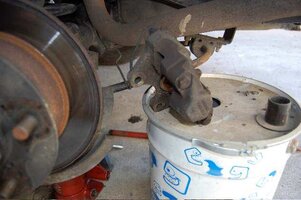
Take caliper off from the disc after both bolts have been loosen off and removed....undo the brake pipes from the plastic clip on the axle and leave caliper on an upturned bucket or zip-tie it out of the way to the chassis rail. NB be very careful as to not bend the brake pipes with force..bend them gently so they can't bulge and pinch.... diligence is the word. Drink beer and pat yourself on the back. Because of this it'll be a sure way of breaking something in the next stage or actually being in a position to draw blood...
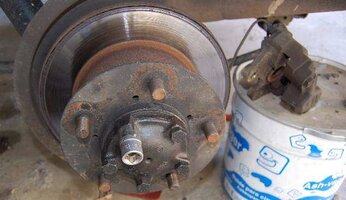
Next, use a 17mm socket and take out the 5 bolts as shown on the hub flange. Normally a strike against the breaker bar with the palm of your hand or light hammer will snap these loose.
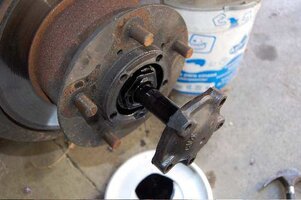
This what you see when pulling out what’s called a half shaft from the axle.....expect a bit of oil....you'll be able to put a good stain on your drive if you really want to...

Put half shaft to one side and keep it clean....this is where a small child, wife or general Donkeyhead can trip over it....and they will...
Drink beer and change music...stand up, walk about and click your back...
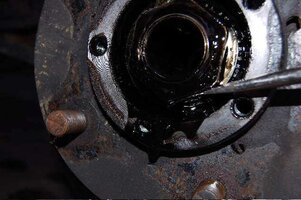
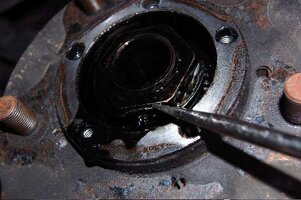
Next you'll find a large nut. This nut is tightened and locked in position by what is called a Tab washer or Lock washer. This nut tightens against the outer wheel bearing and keeping both outer and inner bearing adjusted and free from play. You will need a flat blade screwdriver or thin cold chisel to lever it off the large nut and enable it to be tapped and bent flat
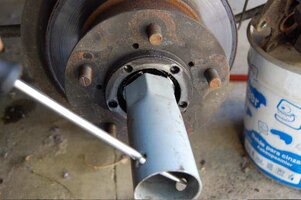
Once bent flat you'll see that you can then offer up a large box spanner to loosen off the nut. If you do not have a box spanner the correct size you can either use vice grips/plumbers pliers to loosen off or tap loose with a cold chisel/strong screwdriver. You will mangle the nut a bit and it should come off easily enough. You'll be able to use the nut again normally along with the tab washer, if you didn’t order new ones. Now is where you can find you can draw blood by missing hitting the chisel/screwdriver...
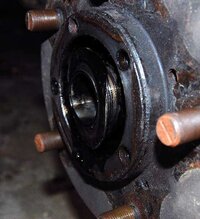
Nut off and slide off tab washer.....

You'll find another nut the same size which you can go ahead and loosen off...if you don't have a box spanner hopefully this one will not be tight...can be awkward to get to without spanner, but it is possible. You can draw more blood now if you so desire.
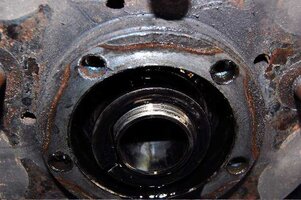
There'll be another washer which is shaped to allow it to fit onto the stub axle...you'll see what a stub axle is in the next picture...anyway...take off washer, remove the hub....it'll be heavy..and catch the outer wheel bearing as it will want to fall out of the hub upon removing. Place in clean container ready for cleaning later. You can kick this container over into the dirt any time you wish...though of course, depending on the amount of beer consumed already, you've probably done this by the time you read this, on your laptop which is just about to slide off the bonnet....
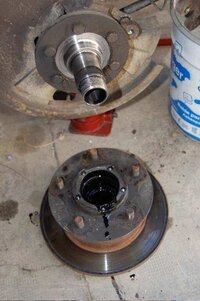
Now you can see what a stub axle is...it's an axle that's...erm.... stubby and short...
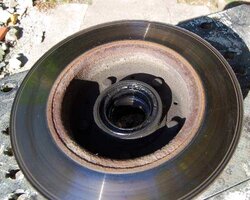
This is what your disc/hub will look like from the other side....you'll see a wheel bearing in there and an oil seal...that's normal...usually...Due to your laptop having a Solid State Drive and falling against the lid upside down and closing same....you're now able to read on and continue...drink beer after a sigh of relief...
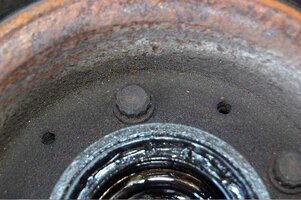
The same type of nuts as on the caliper live in the back of the hub...you'll need an extension bar and a 14mm socket and a breaker bar..and that lump hammer to hit your knuckle with..again a perfect opportunity to draw blood.
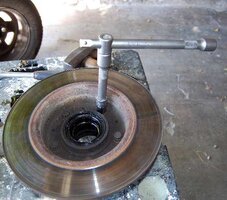
Again whack the breaker bar whilst holding the extension bar vertical...if it doesn’t loosen off you'll probably need heat and or copious amounts of WD40 (If heat is needed.... pry out oil seal first and lift out wheel bearing).....The reason it might not come off easily is that it'll be rusted to the hub. Only one of mine actually tapped off gently...the rest needed heat.
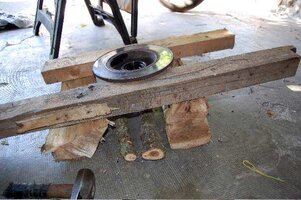
After heat you'll need more beer...after this , put the disc and hub in the position as shown..I invented a wooden frame work ......
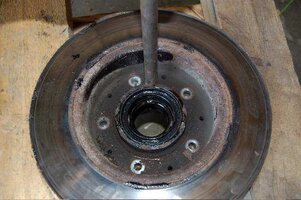
Whack the centre of the hub (shown where the oil seal is)before doing so pry out the oil seal and remove the wheel bearing.
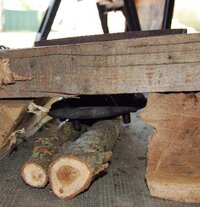
If and when it drops out the hub and threaded wheel studs will hit the ground damaging same, hence that's why there's soft wood to catch it
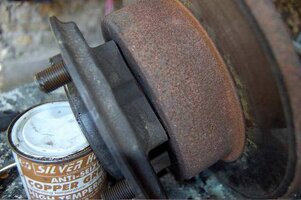
After whacking the centre of the hub to try and free it...there'll be a few dings in it, and you'll see it coming adrift in its own time.....as shown...at this time your knuckle blood will help lubricate the hub and assist in the task as given.
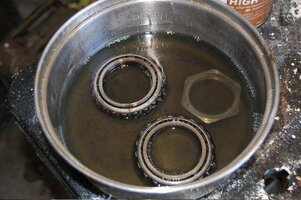
Take out the inner wheel bearing and clean with the outer bearing that was taken out earlier....Clean in petrol with an old toothbrush....Your open wounds will now be stinging with the petrol so drink more beer.....
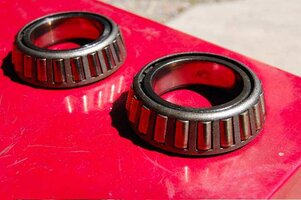
Allow to dry in the sun after cleaning...or in a strong wind depending where one lives... inspect outer cage for dings and cracks etc...if all looks OK...then it is...
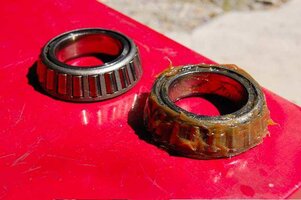
Use a good wheel bearing grease if you can't a normal LM Grease will suffice.
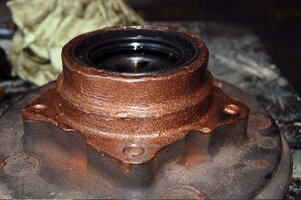
After cleaning and rinsing the inside of hub with petrol, clean outside of hub with a wire brush etc and put a smear of anti seize on the hub to where the new disc will be offered up to(you cant see the blood for the grease)..you can see the dings on the hub caused by whacking with a bar...(if anyone can show a different less damaging method to get the disc off please feel free to comment)....put in wheel bearing and install new oil seal
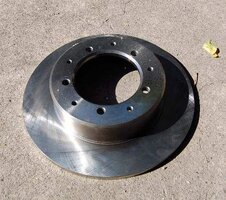
Speaking of which..this is what the new disc looks like...round, shiny and dead heavy should it fall on your toe...drink beer and change music...click back after lifting disc.
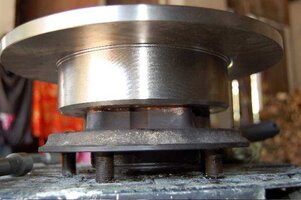
Offer disc to hub making sure it's on evenly.....tap gently if need be.
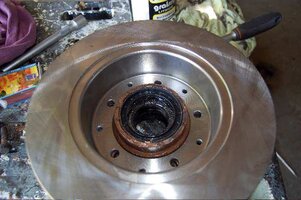
Hub/new disc shown from the oil seal side and with the wheel bearing installed...screw in the five 14mm bolts...some use loctite threadlock on them ...it's your call....in this instance I did. It'll heat off again when discs are renewed next time...that is of course if my truck gets to another 299000kms...mmm..don't know about that...
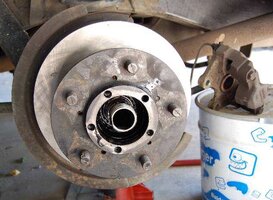
Slide hub/disc onto the stub axle after putting a smear of grease over same....a wiggle here and there should allow it to slide on....if it does not slide on you're doing it wrong (the story of my life...according to my wife)
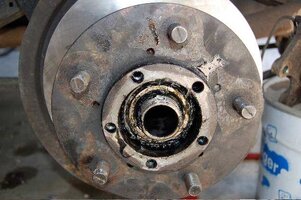
Slide on the outer greased up wheel bearing into the hub..again it should slide on without protest...

Slide on tab washer against the wheel bearing...tighten up one of the large nuts that was taken off earlier until the hub turns with just a slight and firm resistance. Put the other tab washer on and tighten up the other large nut against this very same tab washer. Tap and bend the tab washer against the outer nut so as to prevent it from ever loosening off and you're good to move on to the next stage...rub oil stains off laptop...and of course by this stage you've guessed it...drink more beer

Put caliper on the same way as it was taken off at the very start.....some would use loctite on the bolts...some just tighten up really tight....its your call...if tightening up really hard make sure the spanner slips and you skin your knuckles again.
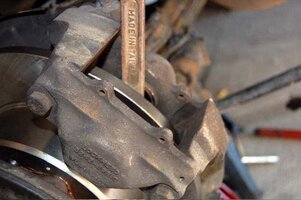
Lever caliper piston by using a tyre lever/screwdriver, against the disc (taking care not to mark disc...use rag against it)) to open it fully to allow the new thicker brake pads to be slid in. Slide in one brake pad and then lever out the other caliper piston with the tyre lever. This is to stop one piston moving in and making the other poke out...kind of like a see saw if it is not done this way. Again if you're really lucky using a long tyre lever, there'll be enough length with it, to slip off the disc and hit you on the lip..result...more blood...so...drink beer.
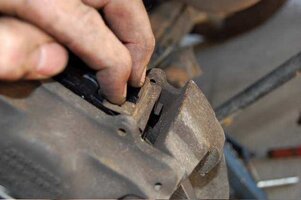
After pads are in and wiggled about to make sure they're home...put back on the brake pin clips as shown along with the brake pins remembering to bend the ends so as they do not vibrate out. Gently pump brake pedal to push pads fully against the disc.
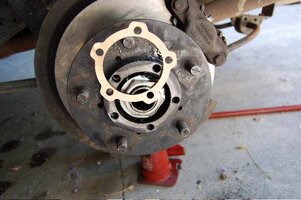
Here you can see the wheel bearing nut and the tab washer bent against the stub axle to prevent it loosening off. Install the paper gasket as shown, in line with the holes close to it .A smear of grease will help it stick to the hub, unless you've arms like an octopus
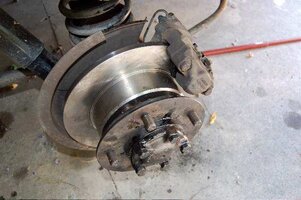
Offer up the half shaft and tighten the 5 bolts as shown. Find the torque settings online.
Finished job....put on wheel and tighten up firmly...at this stage it would do no harm to grab wheel at the 12 o'clock position and 6 o'clock position and try to feel if there's any play...if so the wheel bearing will need tightened again to remove play. Lower LR onto wheel and tighten wheel nuts.
Anyone can chime in to assist with what I have/haven’t covered and with any other method/procedure.
Stuff needed in no particular order,music,beer,13mm ring spanner,13mm socket,14mm socket, 17mm socket or ring spanner, beer, large flat head screwdriver, small cold chisel ,extension bar, breaker bar, ratchet, beer, club hammer, bar for using as a drift, beer, pliers, vice grips ,plumbers pliers, beer, petrol, grease ,tab washers, flange gaskets, torque wrench(optional)normal hammer, small gas blow torch, beer ,and WD40...oh ....and don't forget beer.
The LR in question is a 1995 300tdi with 299000kms and the discs have never been changed before. Install discs/pads as an axle set.
So...without further ado..make sure you have a free afternoon devoid of children and wife (unless she offers to make tea at frequent intervals)..in the absence of tea, beer will be required along with music...
So rear offside first...or in my case rear nearside...who's correct?....

Loosen off wheel nuts and jack LR up and lower onto an axle stand. You'll need these as you'll be peeping in under the wheel arches to look where you'll be locating spanners......rock the truck too much it'll drop onto the back of your neck... Once you take the wheel off move it well out of the way as you'll not be needing it anywhere near you for quite some time!

Now you will see the exposed hub, disc and calipers. A brake caliper is the big heavy looking bracket attached to the disc (here shown at the 2 o'clock position)which in turn is where the brake pads live. You see where the disc is thin when compared to the new one you have on stand-by. Note ....Drink beer.

See how there's corrosion along the circumference

Brake caliper can be seen with the old pads in situ(centre of picture)complete with brake pad pins. Note drink beer.

Pull out brake pins with pliers after bending the ends together to allow to do so ....there'll be light metal clips underneath the pins..take a picture or try and remember what way these are located..they'll be used again at the very end of the job....don't forget to bang your head on the wheel arch...this is allowed anytime from now on due to your impatience to get the job done

Pull out brake pads with the pliers... if the pliers slip off you can, if you're lucky, ding your fingers on inner guards....note it's too early to draw blood at this stage

NB.....After removing the brake fluid reservoir top(under the bonnet) you can, if need be, lever the pads(with large flat blade screwdriver/ tyre lever) against the caliper to allow free movement to lift out the pads....the reason for the brake fluid reservoir top taken off is that if you lever the brake pads against the caliper it'll push the fluid back into the reservoir and the top off makes it easier to lever as there's no pressure to contend with.

Look behind caliper and see, close to the axle, 2 castellated bolt heads. These do not require a special tool but only a 13mm ring spanner or socket. keep the spanner/ socket under tension and whack it with a hammer to loosen it from the caliper threads...It'll be a hard push if you don't do this. Drink beer and change music

Take caliper off from the disc after both bolts have been loosen off and removed....undo the brake pipes from the plastic clip on the axle and leave caliper on an upturned bucket or zip-tie it out of the way to the chassis rail. NB be very careful as to not bend the brake pipes with force..bend them gently so they can't bulge and pinch.... diligence is the word. Drink beer and pat yourself on the back. Because of this it'll be a sure way of breaking something in the next stage or actually being in a position to draw blood...

Next, use a 17mm socket and take out the 5 bolts as shown on the hub flange. Normally a strike against the breaker bar with the palm of your hand or light hammer will snap these loose.

This what you see when pulling out what’s called a half shaft from the axle.....expect a bit of oil....you'll be able to put a good stain on your drive if you really want to...

Put half shaft to one side and keep it clean....this is where a small child, wife or general Donkeyhead can trip over it....and they will...
Drink beer and change music...stand up, walk about and click your back...


Next you'll find a large nut. This nut is tightened and locked in position by what is called a Tab washer or Lock washer. This nut tightens against the outer wheel bearing and keeping both outer and inner bearing adjusted and free from play. You will need a flat blade screwdriver or thin cold chisel to lever it off the large nut and enable it to be tapped and bent flat

Once bent flat you'll see that you can then offer up a large box spanner to loosen off the nut. If you do not have a box spanner the correct size you can either use vice grips/plumbers pliers to loosen off or tap loose with a cold chisel/strong screwdriver. You will mangle the nut a bit and it should come off easily enough. You'll be able to use the nut again normally along with the tab washer, if you didn’t order new ones. Now is where you can find you can draw blood by missing hitting the chisel/screwdriver...

Nut off and slide off tab washer.....

You'll find another nut the same size which you can go ahead and loosen off...if you don't have a box spanner hopefully this one will not be tight...can be awkward to get to without spanner, but it is possible. You can draw more blood now if you so desire.

There'll be another washer which is shaped to allow it to fit onto the stub axle...you'll see what a stub axle is in the next picture...anyway...take off washer, remove the hub....it'll be heavy..and catch the outer wheel bearing as it will want to fall out of the hub upon removing. Place in clean container ready for cleaning later. You can kick this container over into the dirt any time you wish...though of course, depending on the amount of beer consumed already, you've probably done this by the time you read this, on your laptop which is just about to slide off the bonnet....

Now you can see what a stub axle is...it's an axle that's...erm.... stubby and short...

This is what your disc/hub will look like from the other side....you'll see a wheel bearing in there and an oil seal...that's normal...usually...Due to your laptop having a Solid State Drive and falling against the lid upside down and closing same....you're now able to read on and continue...drink beer after a sigh of relief...

The same type of nuts as on the caliper live in the back of the hub...you'll need an extension bar and a 14mm socket and a breaker bar..and that lump hammer to hit your knuckle with..again a perfect opportunity to draw blood.

Again whack the breaker bar whilst holding the extension bar vertical...if it doesn’t loosen off you'll probably need heat and or copious amounts of WD40 (If heat is needed.... pry out oil seal first and lift out wheel bearing).....The reason it might not come off easily is that it'll be rusted to the hub. Only one of mine actually tapped off gently...the rest needed heat.

After heat you'll need more beer...after this , put the disc and hub in the position as shown..I invented a wooden frame work ......

Whack the centre of the hub (shown where the oil seal is)before doing so pry out the oil seal and remove the wheel bearing.

If and when it drops out the hub and threaded wheel studs will hit the ground damaging same, hence that's why there's soft wood to catch it

After whacking the centre of the hub to try and free it...there'll be a few dings in it, and you'll see it coming adrift in its own time.....as shown...at this time your knuckle blood will help lubricate the hub and assist in the task as given.

Take out the inner wheel bearing and clean with the outer bearing that was taken out earlier....Clean in petrol with an old toothbrush....Your open wounds will now be stinging with the petrol so drink more beer.....

Allow to dry in the sun after cleaning...or in a strong wind depending where one lives... inspect outer cage for dings and cracks etc...if all looks OK...then it is...

Use a good wheel bearing grease if you can't a normal LM Grease will suffice.

After cleaning and rinsing the inside of hub with petrol, clean outside of hub with a wire brush etc and put a smear of anti seize on the hub to where the new disc will be offered up to(you cant see the blood for the grease)..you can see the dings on the hub caused by whacking with a bar...(if anyone can show a different less damaging method to get the disc off please feel free to comment)....put in wheel bearing and install new oil seal

Speaking of which..this is what the new disc looks like...round, shiny and dead heavy should it fall on your toe...drink beer and change music...click back after lifting disc.

Offer disc to hub making sure it's on evenly.....tap gently if need be.

Hub/new disc shown from the oil seal side and with the wheel bearing installed...screw in the five 14mm bolts...some use loctite threadlock on them ...it's your call....in this instance I did. It'll heat off again when discs are renewed next time...that is of course if my truck gets to another 299000kms...mmm..don't know about that...

Slide hub/disc onto the stub axle after putting a smear of grease over same....a wiggle here and there should allow it to slide on....if it does not slide on you're doing it wrong (the story of my life...according to my wife)

Slide on the outer greased up wheel bearing into the hub..again it should slide on without protest...

Slide on tab washer against the wheel bearing...tighten up one of the large nuts that was taken off earlier until the hub turns with just a slight and firm resistance. Put the other tab washer on and tighten up the other large nut against this very same tab washer. Tap and bend the tab washer against the outer nut so as to prevent it from ever loosening off and you're good to move on to the next stage...rub oil stains off laptop...and of course by this stage you've guessed it...drink more beer

Put caliper on the same way as it was taken off at the very start.....some would use loctite on the bolts...some just tighten up really tight....its your call...if tightening up really hard make sure the spanner slips and you skin your knuckles again.

Lever caliper piston by using a tyre lever/screwdriver, against the disc (taking care not to mark disc...use rag against it)) to open it fully to allow the new thicker brake pads to be slid in. Slide in one brake pad and then lever out the other caliper piston with the tyre lever. This is to stop one piston moving in and making the other poke out...kind of like a see saw if it is not done this way. Again if you're really lucky using a long tyre lever, there'll be enough length with it, to slip off the disc and hit you on the lip..result...more blood...so...drink beer.

After pads are in and wiggled about to make sure they're home...put back on the brake pin clips as shown along with the brake pins remembering to bend the ends so as they do not vibrate out. Gently pump brake pedal to push pads fully against the disc.

Here you can see the wheel bearing nut and the tab washer bent against the stub axle to prevent it loosening off. Install the paper gasket as shown, in line with the holes close to it .A smear of grease will help it stick to the hub, unless you've arms like an octopus

Offer up the half shaft and tighten the 5 bolts as shown. Find the torque settings online.

Finished job....put on wheel and tighten up firmly...at this stage it would do no harm to grab wheel at the 12 o'clock position and 6 o'clock position and try to feel if there's any play...if so the wheel bearing will need tightened again to remove play. Lower LR onto wheel and tighten wheel nuts.
