Well, you’ve done it now! You bought a series Land Rover! Congratulations, the fun of owning a Series Landy is now on your doorstep. But to really enjoy your Landy, you need to know how to look after it; a bit of time and effort now will likely save you a load of hassle in the future.
So, with this thought in mind, your friends on this forum decided we would give you some insights and pointers to maintaining your new pride and joy.
First of all, some guides to routine safety checks and suchlike. Most of these procedures are common to all standard 2.25 Landies, short or long wheel based models.
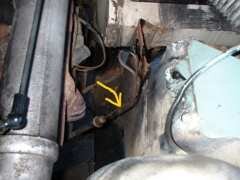
Every week, you should be checking the oil level in the engine (I personally do it every morning, but I confess I don’t always face Solihull It’s a ritual that only takes a minute or two…). The dipstick is on the right hand side of the engine when viewed from in front:

Ideally the oil level ought to be between the ‘level’ and ‘high’ mark; neither too full nor too low.
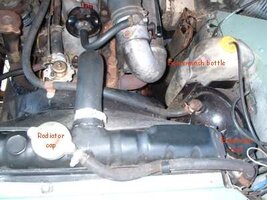
Check the coolant level (again, I do this every morning). It should be just below the level of the filler cap on the radiator, and if your Landy has an expansion tank fitted to the cooling system it should be about half full:

You will find the level in the expansion tank may vary according to the temperature of the engine, you MUST remember though, DO NOT remove the radiator cap when the engine is hot, the system is pressurised and scalded hands are not a lot of use to you if you want to drive your Landy!
You lifted the bonnet to check the oil and coolant, so whilst you are under there you can check the brake and clutch fluid reservoirs:

On later models these are separate, as in the photo (though there isn’t always a brake servo fitted), but some earlier models have a metal can which contains the fluid for both systems. There is an inner and outer container, and there should ideally have a level amount of fluid in each.
[BREAK]Check the battery electrolyte levels; remove the caps and see that the fluid in the battery covers the lead plates inside. If not, top up the cells with de-ionised water – battery top up fluid is available from most garage forecourts and motor factors.
Now, a quick visual check to make sure nothing is loose, or leaking (more than usual? ). Don’t forget to check the screenwash bottle! Now you can close the bonnet down.
Check the lights…. All working? Get a friend (or long suffering spouse!) to check that your brake lights are working. They aren’t the brightest lights in the world, but they do warn folks that you are going to slow down or stop. Check the horn, the indicators and the wipers at the same time.
Check the tyre pressures weekly too… I usually have a pressure of 30psi all round, going up to 35psi on the rear when loaded; this is for a SWB with 205x16 wheels and tyres. The owner’s manual states that the pressure for 600x16 tyres (crossply) is 25psi all round, and 30psi on the rear when loaded, but that looks very soft on a radial 205 tyre! 750x16 tyres on a LWB should be 25psi all round, and 36psi on the rear when loaded. Again though, I usually check the tyres every morning; you soon get to know what they look like at the right pressure, and if one looks soft. Don’t forget to check the spare while you are at it!
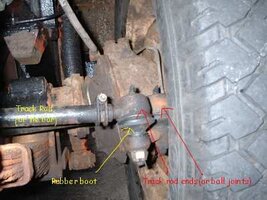
A quick check around the vehicle now… Nothing falling off??! Check the exhaust for security of fixing, and then inside the wheel rims – look for any fluid on the drums or wheel rims and tyres which could point to a failed oil seal, or a leaky brake wheel cylinder. Have a look at the track rod ends and tie rods – look for split rubbers or bent rods:

The simplest way to check the track rod ends is to grab hold of the rod and push and pull up and down…..there should be no clunks or clonks! The rubber boots on the track rod ends (or ball joints) should not be split or cracked; it’s easy enough to spot if they are, as the grease contained in them will ooze out if they are damaged. If they are split, dirt and water can get in, and cause damage to the joint itself.
If you do suspect wear or damage to the track rod end ball joints, get an assistant (the long suffering spouse again??!!) to briskly turn the steering wheel left and right half a turn from the straight ahead position whilst you watch the track rod ends. Any visible side to side movement within the joint itself indicates wear in the track rod end, and it will need to be replaced. (Replacing the track rod ends and rubber boots will be covered in a later article.)
Everything looks okay?! Right then, off you go, you can drive around now…everything is as it should be….. BUT….. You are going to be doing some servicing soon, aren’t you? Of course you are!
So, with this thought in mind, your friends on this forum decided we would give you some insights and pointers to maintaining your new pride and joy.
First of all, some guides to routine safety checks and suchlike. Most of these procedures are common to all standard 2.25 Landies, short or long wheel based models.
Every week, you should be checking the oil level in the engine (I personally do it every morning, but I confess I don’t always face Solihull

Ideally the oil level ought to be between the ‘level’ and ‘high’ mark; neither too full nor too low.
Check the coolant level (again, I do this every morning). It should be just below the level of the filler cap on the radiator, and if your Landy has an expansion tank fitted to the cooling system it should be about half full:

You will find the level in the expansion tank may vary according to the temperature of the engine, you MUST remember though, DO NOT remove the radiator cap when the engine is hot, the system is pressurised and scalded hands are not a lot of use to you if you want to drive your Landy!
You lifted the bonnet to check the oil and coolant, so whilst you are under there you can check the brake and clutch fluid reservoirs:

On later models these are separate, as in the photo (though there isn’t always a brake servo fitted), but some earlier models have a metal can which contains the fluid for both systems. There is an inner and outer container, and there should ideally have a level amount of fluid in each.
[BREAK]Check the battery electrolyte levels; remove the caps and see that the fluid in the battery covers the lead plates inside. If not, top up the cells with de-ionised water – battery top up fluid is available from most garage forecourts and motor factors.
Now, a quick visual check to make sure nothing is loose, or leaking (more than usual?
Check the lights…. All working? Get a friend (or long suffering spouse!) to check that your brake lights are working. They aren’t the brightest lights in the world, but they do warn folks that you are going to slow down or stop. Check the horn, the indicators and the wipers at the same time.
Check the tyre pressures weekly too… I usually have a pressure of 30psi all round, going up to 35psi on the rear when loaded; this is for a SWB with 205x16 wheels and tyres. The owner’s manual states that the pressure for 600x16 tyres (crossply) is 25psi all round, and 30psi on the rear when loaded, but that looks very soft on a radial 205 tyre! 750x16 tyres on a LWB should be 25psi all round, and 36psi on the rear when loaded. Again though, I usually check the tyres every morning; you soon get to know what they look like at the right pressure, and if one looks soft. Don’t forget to check the spare while you are at it!
A quick check around the vehicle now… Nothing falling off??! Check the exhaust for security of fixing, and then inside the wheel rims – look for any fluid on the drums or wheel rims and tyres which could point to a failed oil seal, or a leaky brake wheel cylinder. Have a look at the track rod ends and tie rods – look for split rubbers or bent rods:

The simplest way to check the track rod ends is to grab hold of the rod and push and pull up and down…..there should be no clunks or clonks! The rubber boots on the track rod ends (or ball joints) should not be split or cracked; it’s easy enough to spot if they are, as the grease contained in them will ooze out if they are damaged. If they are split, dirt and water can get in, and cause damage to the joint itself.
If you do suspect wear or damage to the track rod end ball joints, get an assistant (the long suffering spouse again??!!) to briskly turn the steering wheel left and right half a turn from the straight ahead position whilst you watch the track rod ends. Any visible side to side movement within the joint itself indicates wear in the track rod end, and it will need to be replaced. (Replacing the track rod ends and rubber boots will be covered in a later article.)
Everything looks okay?! Right then, off you go, you can drive around now…everything is as it should be….. BUT….. You are going to be doing some servicing soon, aren’t you? Of course you are!
