• Welcome to the Land Rover UK Forums

    You are currently viewing the site as a guest and some content may not be available to you.

    Registration is quick and easy and will give you full access to the site and allow you to ask questions or make comments and join in on the conversation. If you would like to register then please Register Now

Series III LWB 'Tent on Wheels' Conversion

Lime Tree Heros

Accelerating Away
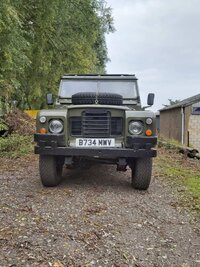
I've always hankered after something that can 'go anywhere' and once you've got there and feel like it, will 'go a bit further'. But what to get? Ignoring the advice of a couple of friends, I decided on a Series III LWB petrol overdrive, after all, there must be good reasons the Army use them and there are so many still around? Plus I actually passed my driving test in one (on secondment at Bovington Camp) and had always had a Landy 'itch' that needed scratching...

Searching the 2nd hand ads, I quickly found that my criteria results were all ex-military apart from a few statioon wagons (which I didn't want). I also found that everything I looked at (sub £5k) and tax free were complete rot boxes. So I refined the search for something with a valid MOT - at least that should be relatively rot free, shouldn't it?

I found what would become my Landy about 120 miles away, popped down, inspected, test drove, agreed a price, left deposit and popped down with a mate a few days later to pay, collect and drive back. I should add that this was during last year's fuel crisis, so I ended up taking 30 ltrs with me as I didn't know where to fill up on the route home...

All went well on the drive back, until... We stopped (I was in convoy with a mate) to confer on where to stop for lunch and I made the schoolboy error of switching off. Guess what? Attempted restart - dead... as a dodo, nothing... Luckily there was space where we'd stopped, so a tow start it was... And somewhat relievingly, not only did it start first time, but it stopped before writing my X3 off... Now that would've been a complicated insurance claim...

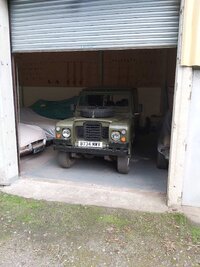
So on with the journey home, experiencing the 'Series wave', the 'interesting' steering, the delight at 60 mph on the motorway, tempered with 45 uphill with the grin on my face slowly growing... Yes I'd made the right choice. Eventually home after a couple of pit stops - Landy left running...

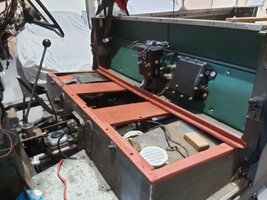
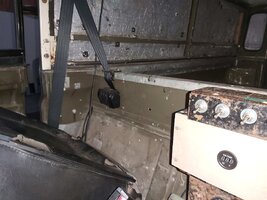
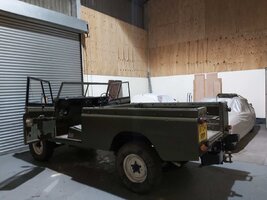
So now I have a dead Landy to sort, before the project can even start...
 

Attachments

  • 20211010_160531.jpg
    20211010_160531.jpg
    571 KB · Views: 66
  • 20211010_160547.jpg
    20211010_160547.jpg
    445 KB · Views: 61
  • 20211010_162416.jpg
    20211010_162416.jpg
    321.9 KB · Views: 55
So, what to do with a dead Landy?

First thing, fully charge batteries (2 × 12v as it's 24v ex military). Result 1 good, 1 bad, so a new battery it was. 2 good, fully charged batteries later and it started first time! Result, but no charge coming out of the alternator generator... Ah... I've seen how expensive those are, was that the real reason behind the po's reason for sale...

So, start checking all the electrical connections and low and behold a loose one found. I'm sure there's probably a proper name for it, but from the generator (going to the generator panel) was an 'Elephant's trunk' of braided cables, held into the generator by a screw up collar, whilst the collar was tight, the braided cables were loose, push them tight, start engine and voila - system charging nicely, pull them loose - nothing.

So undo collar and sort out. Closer inspection revealed an internal circlip in the external collar, as there's a lip on the 'Elephant's trunk' if that lip is after the circlip it's loose when the collar is tightened.

So, just - 1 - remove circlip, 2 - push collar further down 'Elephant's trunk' and 3 - replace circlip on the other side of the lip on the 'Elephant's trunk'.

1 and 2 easy 3 an absolute nightmare - took God knows how many attempts, at one point I thought I'd dislocated my wrist. But finally done... so Landy can go in and out of the shed and the project can start.

If I ever encounter the same problem again, I'll try completely removing the 'Elephant's trunk' from the vehicle before sorting it on the bench.
 
To budget or not to budget?

First off, I've always 'tinkered' with cars... A few years ago I started a complete nut and bolt bare metal restoration of my 1972 MGB GT. After finally completing it a few people asked how much it cost me to do and I had no idea, I didn't keep records or receipts, just slowly ploughed on with it.

This time things in life are a bit different, so I wanted to know what sort of financial commitment I was making  before I started, to a - go into it eyes wide open and b - ensure I could afford it.

With a background in Architecture, I was well used to priced schedules and specifications etc. So went through things and using the Internet came up with 3 categories for budgeting:

 Conversion - which included all aspects to specifically covert the Landy into a 'tent on wheels'.
Repair - all items repaired, not associated with the conversion.
Contingency - frequently overlooked, but essential to produce a realistic budget, when doing any work to a ~40 year old vehicle you can never be 100% certain of what will or will not need doing. I also included an amount for 'unforeseen' items.

The budgets are to include for everything purchased, except any tools, which are a separate long term investment...

So with everything planned and budgeted for what could possibly go wrong?

First day - preparing to remove the hard top, discovered the top mount for the 3 point seat belt mounts on the hard top. And guess what? There's no mounting point on a canvas tilt :( doh...

So - solutions - a) lap belts - no thanks, my MGB had those when I got it in the 90's and they hurt (since replaced with inertia 3 point) - b) 3 point with reel mounted 'over the shoulder' on the bulkhead between truck and cab - no thanks, that's got broken collar bones written all over it - c) 3 point with top mount on a 'seat belt bar'.

Got to be c - I've got to have 3 point inertia reels and they've got to be mounted properly.

The best laid plans of mice and men... So day 1 and I'm already dipping into the 'Unforeseen' section of the contingency budget. What else could possibly go wrong?
 

Attachments

  • 20220614_201231.jpg
    20220614_201231.jpg
    289.5 KB · Views: 51
  • 20211109_160106.jpg
    20211109_160106.jpg
    206.5 KB · Views: 54
c) 3 point with top mount on a 'seat belt bar'.
Sounds like your needing one of these:
At least its considerably less than the specialist roll frame and seat belt bar I needed for my 90. That one was an unexpected £500 extra to my spend.

Speaking of budgeting. I too went in to my restoration with a budget but decided to throw it out the window once I decided that the vehicle I was planning on keeping long term. I swapped from a mentality of "must keep spend under X amount" to one of "if a jobs worth doing its worth doing right". 😅
Doesn't mean I took my eye of the spend though. I have a file full of receipts and given that I took note of each bill in aa notebook I can tell you exactly how much I spent to the penny.

As it happens I trained as an Architectural Technologist, though am currently not working in thar field.

Great minds... That's exactly what I've gone for, the fact it bolted straight in using minimal bodywork drilling and no welding was a plus point too.
 
No 'Tent on wheels' has a.hard top, it needs canvas, so first thing off with the hard top. All fairly easy, just undid lots of nuts and bolts - even managed to get away without shearing any....

Then stripped out all the sealing rubbers and seat belts - sealing rubbers all liberally coated with a thick layer of green, by a PO - really?

Then trial fitted, seat belt bar, seat belts and hood sticks. Moved seat belt reels from the back of the bulkhead between cab and truck onto the angled strengthener for the door catch. Repositioned the seat belt guides.

Bolted in the seat belt bar, lovely fit, went straight in no problems at all. Then cracked on with the hood sticks - all in no problems. However, the brackets on the front stick for the pieces that surround the front doors needed quite a lot of fettling. Much heating with a blowtorch and bending / twisting with a sash cramp for leverage and they now are a decentish fit. Bolted (only) the windscreen header rail on and then it's time to trial fit the tilt!

Canvas fully on! First step to being a 'tent on wheels' now complete!
 

Attachments

  • 20211214_151244.jpg
    20211214_151244.jpg
    81.1 KB · Views: 52
  • 20211222_170255.jpg
    20211222_170255.jpg
    206.2 KB · Views: 42
  • 20211222_183413.jpg
    20211222_183413.jpg
    168.2 KB · Views: 42
  • 20211222_194817.jpg
    20211222_194817.jpg
    219.7 KB · Views: 49
  • 20211222_194805.jpg
    20211222_194805.jpg
    266 KB · Views: 46
  • 20211222_195218.jpg
    20211222_195218.jpg
    176.8 KB · Views: 48
So, on to the tailgate and back end. As I had no tailgate to begin with the search for one was on. I'd already decided to steer clear of new ones (presumably all from China) guessing that they don't really fit. Found one on gumtree and £85 and a short drive later it was mine.

But it needed fettling... Here I had a huge stroke of luck, a friend knew a semi retired metal fabricator who had all the and was happy welding 'interesting stuff' for beer money. A quick trip over and a week later, the central rib on the tailgate had been removed, straightened and replaced and a couple of fractures welded up - all for £35.

As I'll need easy access into the back of the 'tent on wheels' rather than have a drop down tailgate I decided to side hinge it and mount it as a door, remove the civvy hitch I had and replace that with a van rear step (autojumble £10).

Whilst all the bits were arriving and trial fitting was taking place, I started looking at the paint - which was thick and over everything... I'd thought I could sand it all down, but no, the top coat was too thick and I think had gone on neat - no added thinners, so all the paint had to come off...

Next up was fitting the 'pioneer tools' to the tailgate and priming and painting the back end, Once things were fully stripped and wire wooled off it was - prime / 240 wet + dry / prime / 400 w+d / paint / 240 w+d / paint / 400 w+d / paint - all with a 2" brush. Paint was Marcus Glen Nato green satin, mixed 50:50 with thinners in batches and kept in jars - although a lengthy process I'm pleased with the end results.

Once everything was bolted and riveted back on, I think things don't look too bad...
20220711_212229.jpg
20220717_194708.jpg
20220717_194758.jpg
20220725_201730.jpg
20220817_140242.jpg
20220818_165127.jpg
20220825_145431.jpg
20220828_164016.jpg
20220920_160202.jpg
20221018_163151.jpg
 
So, on to the tailgate and back end. As I had no tailgate to begin with the search for one was on. I'd already decided to steer clear of new ones (presumably all from China) guessing that they don't really fit. Found one on gumtree and £85 and a short drive later it was mine.

But it needed fettling... Here I had a huge stroke of luck, a friend knew a semi retired metal fabricator who had all the and was happy welding 'interesting stuff' for beer money. A quick trip over and a week later, the central rib on the tailgate had been removed, straightened and replaced and a couple of fractures welded up - all for £35.

As I'll need easy access into the back of the 'tent on wheels' rather than have a drop down tailgate I decided to side hinge it and mount it as a door, remove the civvy hitch I had and replace that with a van rear step (autojumble £10).

Whilst all the bits were arriving and trial fitting was taking place, I started looking at the paint - which was thick and over everything... I'd thought I could sand it all down, but no, the top coat was too thick and I think had gone on neat - no added thinners, so all the paint had to come off...

Next up was fitting the 'pioneer tools' to the tailgate and priming and painting the back end, Once things were fully stripped and wire wooled off it was - prime / 240 wet + dry / prime / 400 w+d / paint / 240 w+d / paint / 400 w+d / paint - all with a 2" brush. Paint was Marcus Glen Nato green satin, mixed 50:50 with thinners in batches and kept in jars - although a lengthy process I'm pleased with the end results.

Once everything was bolted and riveted back on, I think things don't look too bad...
View attachment 299531View attachment 299532View attachment 299533View attachment 299534View attachment 299535View attachment 299536View attachment 299537View attachment 299538View attachment 299539View attachment 299540
Your rear end looks cracking 😳..great job .
surprising how well the finish can look with a brush . I like that ..
 
Next on the list was the cab.

20220113_142118.jpg


Firstly out came the seats, the seat foams of which has started disintegrating covering everything in a layer of seat foam dust... I understand I've got non military standard 'county' seats, but decided to keep them and got a foam and vinyl cover kit from Exmoor - good value I thought, same price as MGB front seat covers so the foams were sort of free...

Stripped seats apart, sanded surface rust back and painted - below is before and after side by side:

20220817_152714.jpg


Next fitted the seat covers, the bases were fine, but getting the backs together was a nightmare, I couldn't get the long plastic clips which hold the cover on to clip together, after many failed attempts, even after watching the Exmoor tutorial video eventually the passenger side was done. Guess what driver's side went on first go in 5 mins - there's a definite knack to doing them...

Next, stripped out the generator panel and shunt box to get at the bulkhead - more holes than Liz Truss's economic policy, so decided to fit trim panels to cover the bulkhead. Cleaned, sanded and painted generator panel, shunt box and battery cover. Had the battery box powder coated.

Painted the central horizontal rib and 'gutter' at the bottom.
20220607_194015.jpg


Cut 5mm ply (free as it had been (badly) lining the hard top) to create trim panels.
20220516_184013.jpg


Covered with 5mm foam and cut recesses for the shunt box mounts and generator panel.

20220609_184818.jpg


Covered with dark green vinyl and replaced shunt box and generator panel.

20220711_220604.jpg


Sanded and painted seat box top and then popped everything back in together.

20220818_192217.jpg


Given the mix and match and missing nuts, bolts and washers, all were replaced by new stainless steel items. All metal to metal meeting points e.g. battery box and seat bases to seat box were given gaskets from a 1mm rubber sheet, hopefully to cut down on rattles and paint scratching in the future.
 

Attachments

  • 20220709_195846.jpg
    20220709_195846.jpg
    157.6 KB · Views: 45
Next up was the lower dash and footwell areas.

First off removed the lower dash and foam and plastic covering to reveal the extent of the rot... It was from this site I learnt that new ones weren't available, that 'good' 2nd hand ones are up there rocking horse poo for rarity value, and that mine wasn't too bad...

So off to my friendly semi retired welder and a week later I collected this:

20220804_170844.jpg


In the meantime I took up the floorpans, gearbox cover and tunnel. These were all cleaned (getting rid of that white masticy stuff) replacement bolts / screws for all the missing ones sought and rebuilt, not using mastic, but gaskets made from 1mm rubber sheet, hopefully this helps keep rattles down and makes things easier and cleaner, should (when) it all needs to come up again.

20220809_164315.jpg


Back to the dash - once back and after trial fitting to drill holes for securing screws in the right place it was covered in 5mm foam (leaving cut outs for the air vents as original)

20220822_221600.jpg


Then comes the tricky bit, covering with vinyl. I've done a bit of trimming before, but despite getting the thinnest and stretchiest vinyl I could, I couldn't get the 'double curves' at either end covered decently. So I created a paper template, cut out a gusset, sewed it up and then fitted - really pleased with the result - the gusset seam is hardly noticeable when fitted.

20220929_202301.jpg


This shows the detail on the w/w motor cover.

20220829_230656.jpg


Created a fascia panel and fitted twin voltmeter (leisure batteries and starter batteries).

20221006_182032.jpg


Back to the footwells and I got a basic carpet set from Exmoor - fitted the two seat box carpets, quite a bit of fettling required, especially driver's side with both handbrake and fuel tank selector to account for. Even managed to retain the original MOD info plates.

20220915_194930.jpg


Fitted footwell carpets and gearbox tunnel carpet - don't think I'll be carpeting the bulkhead above them gearbox - That's full of hand throttle, battery master cut off and some original signage, but I can always review in the future.

20221013_203644.jpg
 
Interesting little cubby box on the door, is it original?

I think it is original to the military, I've 2 small ones on the driver's door

20221110_145131.jpg


And one big one on the passenger door

20221110_145149.jpg


They're made from folded sheet aluminium and riveted on.
Took me a couple of weeks to realise one of my interior door handles was upside down too!
 
I think it is original to the military, I've 2 small ones on the driver's door

View attachment 301425

And one big one on the passenger door

View attachment 301426

They're made from folded sheet aluminium and riveted on.
Took me a couple of weeks to realise one of my interior door handles was upside down too!
That’s funny mine are upside down aswell..I had an ex military lightweight I didn’t have the boxes on me doors ..
 
Back
Top Bottom