There you were driving along in two wheel drive; you came to a low speed corner or a junction, or you hit a patch of loose gravel and ‘crunch!!’ , suddenly you lost drive! There was a grinding, crunching sound from the rear end, and now you have come to a halt.
In all probability you have broken a half-shaft; the connection that delivers the drive from the rear differential to the road-wheels. Because of the way the differential works, breaking one half-shaft results in the drive from the differential taking the line of least resistance. The wheel with the broken shaft will not turn, as the broken piece of shaft is now turning all by itself, robbing the other wheel of drive. (This is the same as when off-road, one wheel can spin in the mud while the other is stationary.)
In this circumstance, engaging 4WD will restore forward momentum, the same as would happen if you lost grip with one wheel when off-road; the front axle will provide the drive to pull you out of a slippery patch and then drive is restored to the rear axle. With a broken half-shaft however, drive to the rear axle is not going to return until you repair it!
If you have free-wheeling hubs fitted to the front axle and they are not engaged, you could be in a bit of bother at this point if you are facing uphill! The handbrake / transmission brake will not work now a half-shaft has broken, and with the free-wheeling hubs disengaged, the front wheels are free to spin independently of the gearbox and drive-train. You now have to sit with your foot on the footbrake, unable to proceed forwards, and unable to get out and engage the front hubs without your Landy rolling away! Hopefully you are not alone, and your passenger can get out and engage the front hubs for you, otherwise you will have to roll back down the hill until you come to a stop, and then get out and engage the hubs, and then 4WD.
Half-shafts rarely break at the outboard, drive flange end – they usually snap off in the differential. For this reason, even though you can still drive your Landy in 4WD, it makes sense to replace the shaft as soon as possible. You do not want bits of steel getting into the bearings in the diff!! You’ll have to take the diff out I am afraid!
As with the differential oil changes, it helps to know what diff you have fitted; removal of the rear half-shafts is pretty much the same in all instances, but removing the differential unit on a Salisbury diff requires specialist tools, and will therefore be beyond most of us. Salisbury differential axles are generally stronger than the Rover type though, and don’t break quite so readily.
So, to business! Firstly, you need to find out which shaft has broken, and what type of shaft you have fitted to your Landy. The diff end of the shaft has 10 splines, but the drive flange end can have either 10 or 24 splines. Removing the ‘top hat’ will show you which it is. This photo shows the later 24 spline half-shaft:
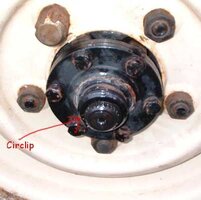
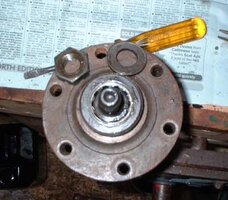
As you can see, the top hat has been removed and the drive flange is held on with a circlip. The next photo shows an earlier 10 spline half-shaft, with a split pin and castle nut:
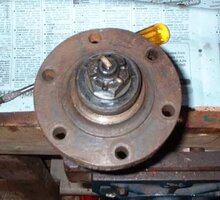
To find which shaft has broken, undo the 6 bolts holding the drive flange to the hub; no need to remove the wheel at this point:
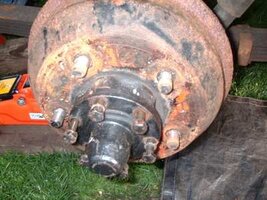
and then withdraw the half-shaft and drive flange complete:

You will soon see which is broken!! In this instance it was the shorter shaft, on the driver’s side:
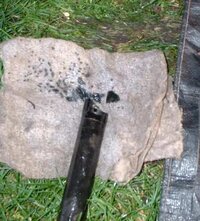
The longer shaft had evidence of wear on the splines when it was removed, so I decided to replace both shafts. They cost £13.90 each, so it made sense to do them both at the same time.
I ordered both shafts, and also a gasket for the differential (part no. 7316), 2 drive flange joint gaskets (part no.231505), 2 new circlips (part no. 549473) and new prop-shaft nuts and bolts (part nos. 50945P, and NZ606041L, 4 of each).
If I had the earlier type of shaft fitted, I would have ordered (in addition to the gaskets and prop-shaft nuts), 2 felt washers (part no. RTC3515) and 2 new split pins (part no.PS608101). Check with your parts dealer which shaft you should be ordering, using the information you already have. (Which diff, number of splines, type of vehicle and year, etc.)
Once you have all the parts you have ordered, you can begin. If you do not have a pit available, jack up the rear driver’s side of the Landy and remove the road-wheel (you already know what I am going to say now, don’t you?? DO NOT rely on the jack alone, use a good set of axle stands to support the Landy – squished folks don’t get driving Landies!!) You won’t need to remove the nearside wheel at this point, though you may need to jack that side up later on.
Remove the filler plug and drain plug from the axle casing and catch the oil in a suitable container, then remove the ‘top hats’ from both drive flanges (unless you intend to replace only one half shaft, in which case remove the hat from the one you are replacing); they are a lot easier to remove whilst still attached to the Landy! Undo the 6 bolts on the drive flanges, and withdraw the shafts from the axle, and stuff some clean rag into the hub to stop the oil in the hub from running out onto the ground (or the N/S wheel).
Now the shafts are removed you can undo the four bolts holding the propshaft to the differential:
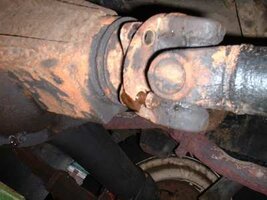
Remember to replace these bolts and nuts with new ones!! (Second-hand ones have a nasty tendency to come undone, with quite disastrous results which are unpleasant to say the least!) You won’t need to undo the handbrake drum end, just support the propshaft out of the way by tying it to the crossmember above.
You can now undo the ten nuts holding the diff to the axle casing. Be sure to clean around the nuts first though, you don’t want them to round off if the socket isn’t on them properly because of dirt:
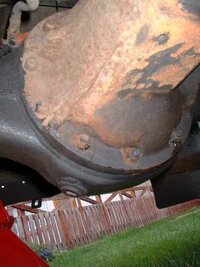
Once the nuts are undone, the diff shouldn’t fall out! In fact you may need to use some subtle persuasion to remove it; a breaker bar is useful here. As the diff comes toward the end of the studs holding it on, be ready, as it is extremely heavy, especially if you are lying beneath it! Now you can see inside the axle casing:
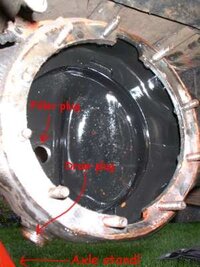
Clean inside the casing with a clean lint free cloth to make sure there are no bits of swarf left inside.
Now, looking at the diff you can see what’s left of the half-shaft in there – in this photo it is highlighted with a cross:
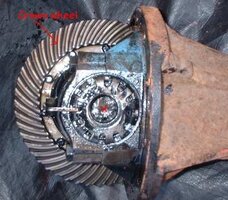
To remove the remaining piece of shaft, turn the diff over, and, from the other side, use a long thin chisel or screwdriver to tap the offending article out … it might be a bit stubborn!
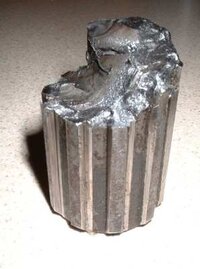
Once it is removed carefully, move the working parts of the diff to check for any bits of shaft, and remove any you find.
Remove any traces of gasket from the diff and from the axle casing and fit the new gasket over the studs on the axle casing, using jointing compound (Hylomar, Hermetite or similar). Refit the diff, and tighten the nuts up to between 66 and 75 lb/ft with a torque wrench, and then replace the propshaft. Don’t forget those new nuts and bolts!
Remove the drive flange from the half-shaft/s by either, removing the circlip, or removing the split-pin, castle nut, washer, and felt washer, depending on the type of shaft you have. You can see the difference between the 10 and 24 spline half-shafts in the photos:
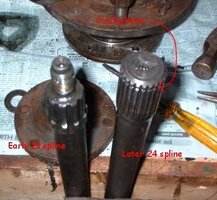
You may need to tap the flange with a soft faced hammer to remove it, or it may just literally fall off!
Now replace the shaft/s with the new one/s, using a new circlip, or felt washer and split pin. Fit the steel washer and castle nut (where fitted) and torque to 10–15 lb/ft. Replace the top hat/s, and insert the half-shafts into the axle casing using the new gaskets and some jointing compound on the flange (do the nearside first, then you shouldn’t have to jack that side up too). Torque the flange securing bolts to 30–38 lb/ft (don’t forget the spring washers). If you have replaced the nearside shaft first, you can now rotate the drum on the off-side to make the flange line up with the bolt holes in the hub (it’s that line of least resistance thing again!).
Once all the nuts and bolts are secure, and the road wheels refitted, refill the diff with clean new EP90, and you should be ready for the road again!
In all probability you have broken a half-shaft; the connection that delivers the drive from the rear differential to the road-wheels. Because of the way the differential works, breaking one half-shaft results in the drive from the differential taking the line of least resistance. The wheel with the broken shaft will not turn, as the broken piece of shaft is now turning all by itself, robbing the other wheel of drive. (This is the same as when off-road, one wheel can spin in the mud while the other is stationary.)
In this circumstance, engaging 4WD will restore forward momentum, the same as would happen if you lost grip with one wheel when off-road; the front axle will provide the drive to pull you out of a slippery patch and then drive is restored to the rear axle. With a broken half-shaft however, drive to the rear axle is not going to return until you repair it!
If you have free-wheeling hubs fitted to the front axle and they are not engaged, you could be in a bit of bother at this point if you are facing uphill! The handbrake / transmission brake will not work now a half-shaft has broken, and with the free-wheeling hubs disengaged, the front wheels are free to spin independently of the gearbox and drive-train. You now have to sit with your foot on the footbrake, unable to proceed forwards, and unable to get out and engage the front hubs without your Landy rolling away! Hopefully you are not alone, and your passenger can get out and engage the front hubs for you, otherwise you will have to roll back down the hill until you come to a stop, and then get out and engage the hubs, and then 4WD.
Half-shafts rarely break at the outboard, drive flange end – they usually snap off in the differential. For this reason, even though you can still drive your Landy in 4WD, it makes sense to replace the shaft as soon as possible. You do not want bits of steel getting into the bearings in the diff!! You’ll have to take the diff out I am afraid!
As with the differential oil changes, it helps to know what diff you have fitted; removal of the rear half-shafts is pretty much the same in all instances, but removing the differential unit on a Salisbury diff requires specialist tools, and will therefore be beyond most of us. Salisbury differential axles are generally stronger than the Rover type though, and don’t break quite so readily.
So, to business! Firstly, you need to find out which shaft has broken, and what type of shaft you have fitted to your Landy. The diff end of the shaft has 10 splines, but the drive flange end can have either 10 or 24 splines. Removing the ‘top hat’ will show you which it is. This photo shows the later 24 spline half-shaft:

As you can see, the top hat has been removed and the drive flange is held on with a circlip. The next photo shows an earlier 10 spline half-shaft, with a split pin and castle nut:

To find which shaft has broken, undo the 6 bolts holding the drive flange to the hub; no need to remove the wheel at this point:

and then withdraw the half-shaft and drive flange complete:

You will soon see which is broken!! In this instance it was the shorter shaft, on the driver’s side:

The longer shaft had evidence of wear on the splines when it was removed, so I decided to replace both shafts. They cost £13.90 each, so it made sense to do them both at the same time.
I ordered both shafts, and also a gasket for the differential (part no. 7316), 2 drive flange joint gaskets (part no.231505), 2 new circlips (part no. 549473) and new prop-shaft nuts and bolts (part nos. 50945P, and NZ606041L, 4 of each).
If I had the earlier type of shaft fitted, I would have ordered (in addition to the gaskets and prop-shaft nuts), 2 felt washers (part no. RTC3515) and 2 new split pins (part no.PS608101). Check with your parts dealer which shaft you should be ordering, using the information you already have. (Which diff, number of splines, type of vehicle and year, etc.)
Once you have all the parts you have ordered, you can begin. If you do not have a pit available, jack up the rear driver’s side of the Landy and remove the road-wheel (you already know what I am going to say now, don’t you?? DO NOT rely on the jack alone, use a good set of axle stands to support the Landy – squished folks don’t get driving Landies!!) You won’t need to remove the nearside wheel at this point, though you may need to jack that side up later on.
Remove the filler plug and drain plug from the axle casing and catch the oil in a suitable container, then remove the ‘top hats’ from both drive flanges (unless you intend to replace only one half shaft, in which case remove the hat from the one you are replacing); they are a lot easier to remove whilst still attached to the Landy! Undo the 6 bolts on the drive flanges, and withdraw the shafts from the axle, and stuff some clean rag into the hub to stop the oil in the hub from running out onto the ground (or the N/S wheel).
Now the shafts are removed you can undo the four bolts holding the propshaft to the differential:

Remember to replace these bolts and nuts with new ones!! (Second-hand ones have a nasty tendency to come undone, with quite disastrous results which are unpleasant to say the least!) You won’t need to undo the handbrake drum end, just support the propshaft out of the way by tying it to the crossmember above.
You can now undo the ten nuts holding the diff to the axle casing. Be sure to clean around the nuts first though, you don’t want them to round off if the socket isn’t on them properly because of dirt:

Once the nuts are undone, the diff shouldn’t fall out! In fact you may need to use some subtle persuasion to remove it; a breaker bar is useful here. As the diff comes toward the end of the studs holding it on, be ready, as it is extremely heavy, especially if you are lying beneath it! Now you can see inside the axle casing:

Clean inside the casing with a clean lint free cloth to make sure there are no bits of swarf left inside.
Now, looking at the diff you can see what’s left of the half-shaft in there – in this photo it is highlighted with a cross:

To remove the remaining piece of shaft, turn the diff over, and, from the other side, use a long thin chisel or screwdriver to tap the offending article out … it might be a bit stubborn!

Once it is removed carefully, move the working parts of the diff to check for any bits of shaft, and remove any you find.
Remove any traces of gasket from the diff and from the axle casing and fit the new gasket over the studs on the axle casing, using jointing compound (Hylomar, Hermetite or similar). Refit the diff, and tighten the nuts up to between 66 and 75 lb/ft with a torque wrench, and then replace the propshaft. Don’t forget those new nuts and bolts!
Remove the drive flange from the half-shaft/s by either, removing the circlip, or removing the split-pin, castle nut, washer, and felt washer, depending on the type of shaft you have. You can see the difference between the 10 and 24 spline half-shafts in the photos:


You may need to tap the flange with a soft faced hammer to remove it, or it may just literally fall off!
Now replace the shaft/s with the new one/s, using a new circlip, or felt washer and split pin. Fit the steel washer and castle nut (where fitted) and torque to 10–15 lb/ft. Replace the top hat/s, and insert the half-shafts into the axle casing using the new gaskets and some jointing compound on the flange (do the nearside first, then you shouldn’t have to jack that side up too). Torque the flange securing bolts to 30–38 lb/ft (don’t forget the spring washers). If you have replaced the nearside shaft first, you can now rotate the drum on the off-side to make the flange line up with the bolt holes in the hub (it’s that line of least resistance thing again!).
Once all the nuts and bolts are secure, and the road wheels refitted, refill the diff with clean new EP90, and you should be ready for the road again!
